Introduction
This guide helps to replace the normally flexible, felt lined rubber and metal trim which sits against the bottom of your window and seals it against rain as well as wiping water off it if you open the window while wet. These items get brittle and peel backwards as they age, resulting in water falling off the window directly into the door cavity and starting to rust things. It's particular important on the drivers side, because the wipers push water off the windshield during rain storms and onto the drivers side door window.
-
-
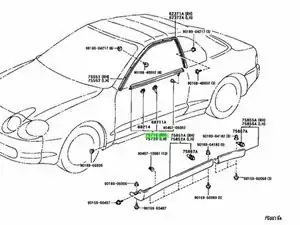
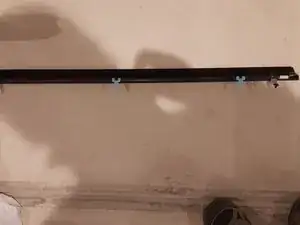
Here is the diagram of the part we are replacing and a picture of a new one laying on the ground. This replacement process is not listed in the factory body repair manual so far as I can see. The tools you will want for this repair are:
-
Pry tool or taped flathead screwdriver
-
Needlenose pliers
-
Optional: Rust Protection Spray
-
Optional: Paper Towels and Mild Soapy Water
-
-
-
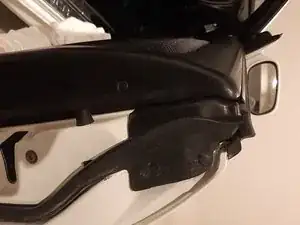
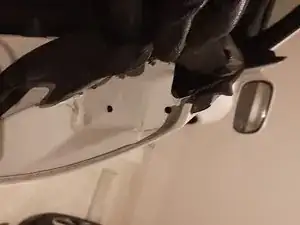
First, roll down the window all the way into the door. Open the door and look at the end of the door. Find the rubber door moulding held on by plastic tabs.
-
All images in this guide have sideways images because less of it is clipped when re-sizing it for horizontal viewing as the website requires it be cropped.
-
-
-
Use your pry tool to get under the tabs and then use the needlenose pliers to wiggle them up and down and side to side while pulling to remove them. They are mushroomed on the back unevenly so its just a matter of pulling but you probably dont want to break them.
-
-
-
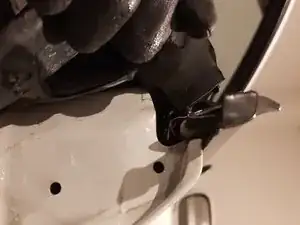
Peel back the flap of moulding to reveal the inside of the door edge. Your goal now is to reach in and unclip the single tab preventing the rain moulding across the top of the door from sliding.
-
-
-
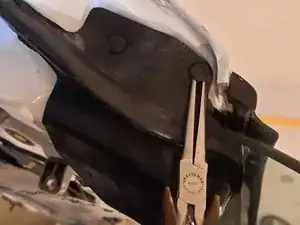
First, using the needlenose pliers, grab the metal tab --circled with number (1)-- that prevents it from sliding and fold it back on itself so it can be slid out without interference. On the end of the metal tab is a plastic pin that sits in a hole in the door metal. It should come out fairly easily with the needlenose pliers, as it's not tight.
-
Then, using the pry tool, push from the direction of the outside of the door on the white plastic clip (2) which holds the moulding onto the track. You may need a pretty good amount of force. As you do this, pull the moulding parallel to the top of the door, forcing it to slide.
-
If you can get the white clip circled with a (2) around the metal in the door, the part should slide off easily after that. The picture in this step shows the white clip now around the metal and starting to slide out.
-
Then you can collect the clips off the top of the door frame for re-use if you plan to refurbish the old rain guards. Removing the blue clips will require pulling back on the top of them, then inserting your pry tool underneath and wedging it away from the inside of the door. They have a 3mm shelf which holds them in place that must be pulled away
-
-
-
Its probably a good idea to wash and protect the track before installing the new part. With the trim removed, you may take the opportunity to spray some rust prevention oil into the door cavity. This area is normally not reachable and easily rusts when the moulding doesn't fit and has gotten old and cracking. I had some light rust on the door bar.
-
Now that you have the old part off, the new part is much easier to put on. It comes with all the clips in the moulding already, you just line it up with the clip holes and lower it onto the door. No sliding necessary. Lower it vertically and press down until it clips on.
-

To reassemble your device, clip the window moulding in vertically instead of sliding it as you did for removal. The new blue clips should slide into holes spaced along the door, with white clips on either end of the moulding. Pressing down firmly will clip it into place.