Introduction

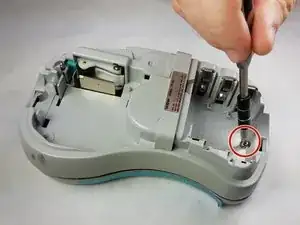
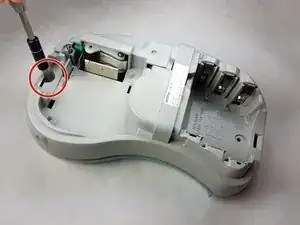
The entire motor/gear assembly housing should be removed before starting.

  1. PNvgPgHjxVVXBouN
    PNvgPgHjxVVXBouN
    GIwWioA4jRVMoIop
    • Push on the side of the cover, and remove it.

  2. jTwTIFsCFCdqiM3e
    • Remove the batteries.

  3. MiJQtvWiUOUUWJnc
    MiJQtvWiUOUUWJnc
    mNDoxiyAXCIHZqxJ
    • Unscrew the two 9 mm Phillips #1 screws from the top and bottom.

    • Total: 2 x Screws

  4. CLcQ3TPbxBJtKFZx
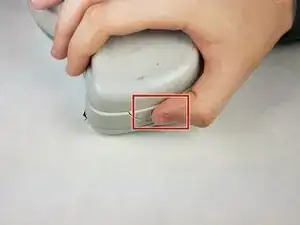
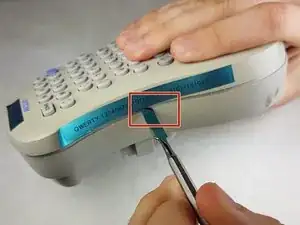
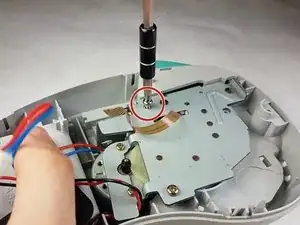
    • First: To separate the top cover from the body, insert a spudger between the two halves.

    • Gently twist the spudger until the two halves separate. Do this in multiple spots around the perimeter of the cover to distribute the pressure.

    • DO NOT PULL HALVES APART. There are wired connections inside that must be disconnected before halves can be fully separated.

  5. jiMeRUpCOVsCrapB
    • Gently separate the two covers, ensuring wires are not taut.

  6. 6bHvwfBMNTEQpbBW
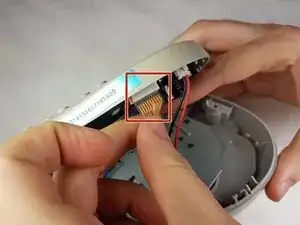
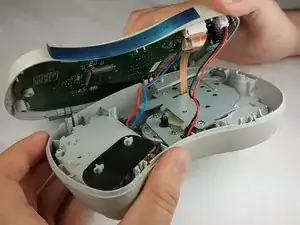
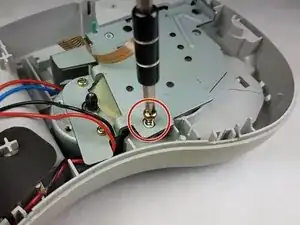
    • Gently grasp the ribbon wire and top cover, then gently pull the ribbon wire out of its connection.

  7. KJOP5psZCVvyBwGX
    KJOP5psZCVvyBwGX
    g14Yg6gYGuoQkQBv
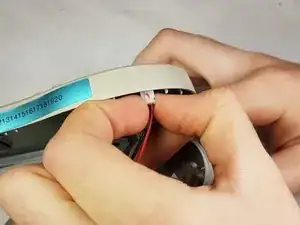
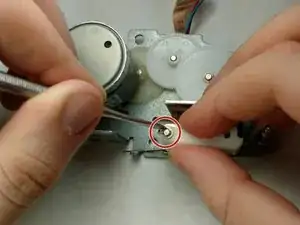
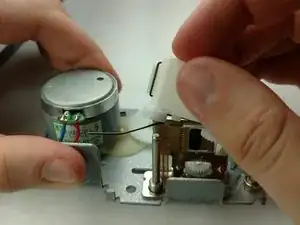
    • Carefully pinch the top of the connector.

    • Pull perpendicular to the device until the wire is disconnected.

    • It may require more force than expected to disconnect the wires.

  8. ujPUjjHJy1RrVjVS
    ujPUjjHJy1RrVjVS
    OwUuqFheQ35ehRDY
    xAXoTo3QxxJgoSZX
    • Unscrew the three 9 mm Phillips #1 screws shown.

    • Total: 3 x Screws

  9. NmIuoRVBWtpBEIlj
    • Using the metal spudger, swivel the pin so that the print roller lever loosens.

  10. XIyZcop5FZOw3tLJ
    • Gently pull the print roller lever out.

    J'aimerais bien trouver cette piece du numéro 10 .la piece de plastique blanche. Le petit bras est brisé. Oui je peux trouver ces piece .Merci vous pouvez me réponds à Pierrepicotte@gmail.com serait apprécié

    Pierre Picotte -

    If the roller is broken, where do you buy a new one? My roller mechanism doesn't move but looks in good condition...

    gsberens -

    Did you ever find a source for the broken roller ??

    Barry Press -

    Suggestion: Brother says no replacement parts are sold or available.

    The print head control arm is a bad design, coupled with a too strong arm spring and under constant pressure once the cartridge door is snapped shut, the control arm fails.

    When storing the label maker, remove the batteries and do NOT snap the cartridge area door shut.

    If you do disassemble, take photos of the process to help reassembly as things shift.

    Fix: This can be done but is not easy. Take the unit apart as the above video shows and put a mark on the motor for orientation as it will shift. Once you have it apart complete. Fish out the broken control arm. This arm can be plastic welded back in its original location and reinforced. This can be done with a small pencil type soldering iron, something to hold the 2 parts correctly while doing the plastic welding. Look on YouTube for hints. After the welds are done check the alignment as this is crucial. Next use very fine steel wire strands and carefully plastic melt these in the same area.

    skywagon185guy -

Conclusion

To reassemble your device, follow these instructions in reverse order.

Kimberly Larsen

Member since: 28/09/16

237 Reputation

5 comments

Hi everybody ,does anyone knows were I can by such a lever ?

TBH

Daniel Verkest -

BONJOUR, (I’m French)

Same question: does anyone knows were I can by such a lever ?

Pegase M -

Did anyone find a source for this part?

Erik Carlson -

Unfortunately very discontinued. Until someone adds it to thingverse there's not much that can be done.

UN8026001 ROLLER HOLDER ASSY PT100/110

UN8031001 ROLLER HOLDER SPRING PT100

UN8032000 ROLLER RELEASE LEVER PT100/110

Michael Krieger -

I can fix these by using plastic weld to rebuild the edging. I was totally successful.

George Pede -