Introduction
The mains 240v Gardena hedge trimmer virtually stopped working with a few sparks coming out of the electric motor. This is typical of worn/damaged carbon brushes and this was found to be so when the brushes were inspected.
It is often quite difficult to find the manufacturers' spare part code for new brushes and/or difficult to find the exact replacement.
This guide shows how to find and modify general purpose carbon brushes that are available on the internet eg Ebay for normally under £5.
Tools
Parts
-
-
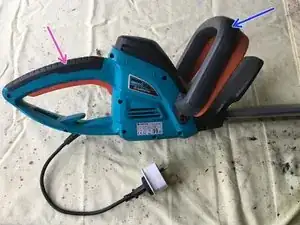
The first image shows general view of the hedge trimmer. Note there are hidden screws under the rear handle cover (pink arrow) and under the front handle assembly. These must be levered off and unscrewed/pulled-away respectively. Splitting the casing can be a dirty job, so protect surfaces.
-
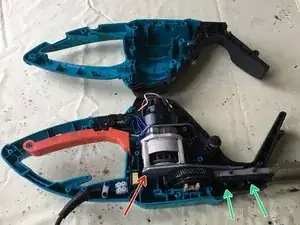
The second image shows the casing split apart after undoing 15 silver screws and 2 black screws (including the hidden screws mentioned above). Also undo the 2 screws securing the mains cable. The whole mechanical and electrical assembly can now be lifted out (maybe a little force required if very old/dirty).
-
If you're lucky, the motor and its cabling will all be held (by friction) in one of the casing halves as shown, so the casings split cleanly. Either way, for reassembly it's easier to arrange it as shown. Be careful not to loose the 2 springs in the switch activation levers.
-
Optionally you can separate the motor and its cabling from the heavy cutting blades by undoing the green arrowed screws and then the red arrowed screws (4 off)
-
-
-
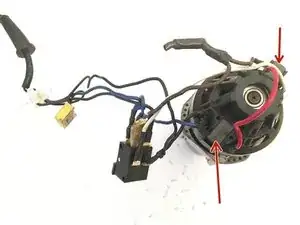
The extracted motor and its wiring are shown in the first image, with the plastic carbon brush housings highlighted with red arrows. One screw holds the brush housing in place (removed in image). Often there are two adjacent screw holes, but I think the unused hole is a backup in case the thread is damaged in the first hole.
-
With the above screw removed, the brush housings can be eased out (note location for reassembly ie the blue wired brush housing is adjacent to the red wire.
-
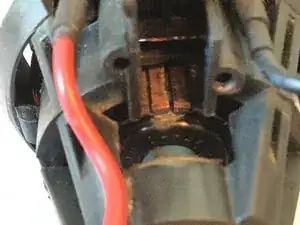
With the brush housing removed, inspect the commutator 2nd and 3rd image). It may be slightly blackened or damaged (green arrow in second image). This can be gently cleaned as required eg using a rubber pencil eraser or a fine 1200 grit abrasive paper.
-
Blow out any abrasive grit and carbon dust, especially away from the bearings at either end of the rotor shaft.
-
The third image, shows a cleaned commutator which is now copper coloured, but still shows slight damage to one of the commutator contacts, but hopefully this damage should not be a problem, other than possibly wearing down the new brushes slightly faster.
-
-
-
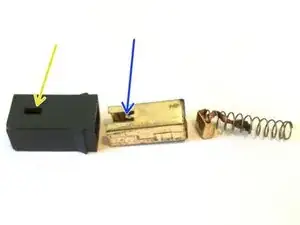
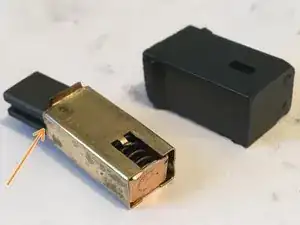
The image shows one of the brush housings and the old brush remnants (spring and flexible contact). There is a copper coloured inner liner, which can be removed by pressing the metal tab (blue arrow) through the hole in the black plastic brush casing (yellow arrow).
-
With the liner removed, the cable to the brush can be removed through a hole on the other side (not shown).
-
In my case, the carbon (graphite) brush had broken up and was mostly missing, so that it was not possible to see what type of brush it was. (Also the spring was free to rattle around and may have caused the slight damage to one of the commutator contacts)
-
-
-
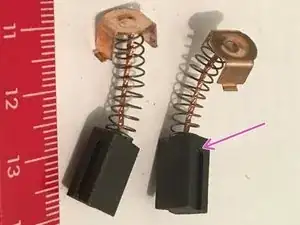
Also when choosing brushes, look at the suppliers images, ie for similar springs (number of coils (12), thickness of wire compared to the old spring (0.5mm), diameter of coil (5mm), free length 20mm and shape of electrical contact (can be filed down- see next section).
-
Ideally, the carbon brush should incorporate a stop (pink arrow), such that when worn out, the spring and other hard parts cannot contact and damage the commutator. The stop is formed by a groove along most 80% of the edge of the new carbon brush such that the other 20% forms the 'stop',
-
There is a corresponding protuberance in the brush liner which fits into the groove (orange arrow).
-
The old brushes may not have had stops, and although this type may last slightly longer, it may have caused the commutator damage.
-
Using a brush with a stop means that it can only be inserted into the liner in one direction ie from the back which is why the liner is removed. Another advantage of using a brush with a stop is that it wont fall out during reassembly.
-
Of course if there is no lug, indentation or protuberance in your brush liner, there is no point buying a brush with a stop. A plain brush would suffice. (No significant difference in price).
-
Measure the inside of the brush liner to find the required dimensions of the new brush, such that it moves unrestricted in the liner (5x8mm in my case). If slightly stiff it can easily be filed down.
-
I think the length of the brush should probably be about 50% of the length of the liner. I choose 12mm long for a 22mm long liner. Ensure it fits in the liner with the spring compressed. If too long the carbon brush can easily be filed down.
-
-
-
The new electrical contacts that are linked to the carbon brush by flexible copper strands, should glide easily in the liner, so that the spring pushes it against the cable contact in the plastic part of the brush holder when the spring is compressed.
-
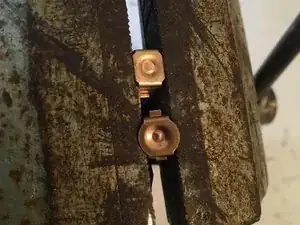
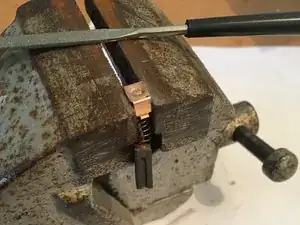
If the new electrical contact is too large for the liner, file it down to size and remove burrs. In my case it was filed from 8,2mm to 5,9mm which took about 10 mins with a fine diamond file. This is best done by holding in a small vice/vise (see images) such that the file doesn't contact the spring.
-
The sides of the contact can also be bent inward with pliers to fit into the liner.
-

It is possible to replace carbon brushes in electric motors without knowing the part number, though it may be necessary to buy what is available and reduce the size of carbon electrode and/or its flexible contact with an abrasive file.