Introduction

It is a design flaw to connect a nylon gear on a splined shaft. the nylon will eventually strip, (Thank you Mrs. Fiorina for telling your engineers to do it cheap.) The goal of this procedure is to show you how to get to the gear and secure it to the shaft.

  1. MCwPDZLKsmKfsVkD
    MCwPDZLKsmKfsVkD
    NilXloIHlk3SZl1M
    qPgJgCl1KNvmNOWZ
    • Review this utube video You won't be doing all of that, but it's a good place to start.

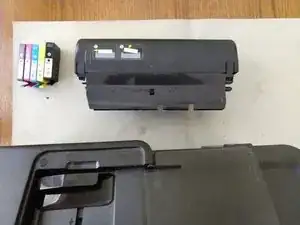
    • Remove the ink cartridges, the duplexer/paper-jam-access-cover and the paper tray.

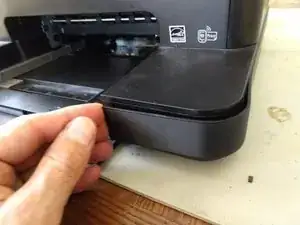
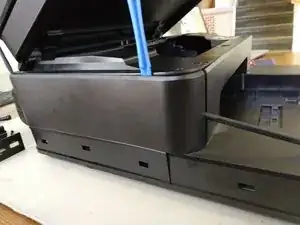
    • Remove lower side covers.

    • This is done by prying out the edge of of the cover that is next to the paper tray and pushing the edge out.

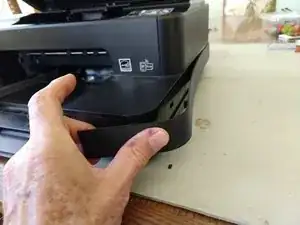
    • Once this face is out, push the cover back.

    The disassembly is not necessary. Using a soldering iron with a knife tip, I cut an access opening in the bottom of the printer. There is a long oblong (looks like)well directly beneath the stripped gear in the bottom panel of the printer. I cut the opening under there, the flat oblong feature on the bottom. Don't cut the structural reinforcing features.

    Using a stiff wire, the superglue gel was applied to splines. The shaft can be rotated in one direction. Slide the gear over an let it harden, then carefully dab the gear sides only. Let it cure.

    Total time under 45 minutes.

    Greg Higuera -

  2. TLVQU2qQQgRF2flx
    TLVQU2qQQgRF2flx
    u1IAmWOm3BSORENG
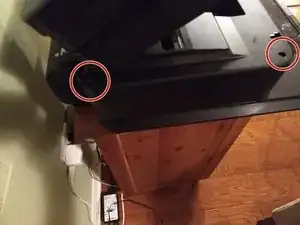
    • Remove 2x 15mm pop off right cover.

    • Split the part on the front and back, then the top. Pry up the top and tilt the top of the panel open, then pull the cover up and out.

  3. EOE1sBsYBRAwnfjI
    • Remove two 10mm screws.

    • Lift and pull out right cover

    • Note the left cover is plugged into the motherboard. Lift front, pull out.

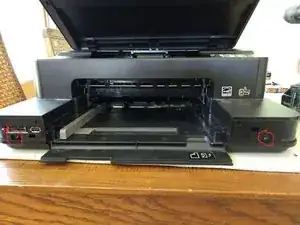
    • lift off paper tray cover

  4. vaZbNaWoOwbaxIrE
    vaZbNaWoOwbaxIrE
    2KSIG1lkInXJQvEr
    • Be gentle.

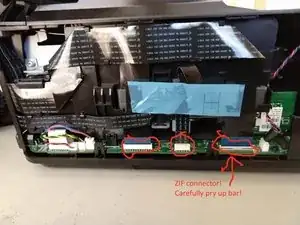
    • IMPORTANT, one has ZIF (zero-insertion -force) connector. Lift up the bar and then remove the cable. During reassembly, ensure the bar is up, insert the cable and push the bar down.

    • The cables go through ferrite collars. Leave the collars in place, but be sure to put the cables back through the collars during reassembly.

    • carefully move the cables to the back

  5. xpouvS4d5SRk5eTl
    xpouvS4d5SRk5eTl
    OHH4FkZ5FbOLGcip
    JK4sjJmpwRgIH3Ls
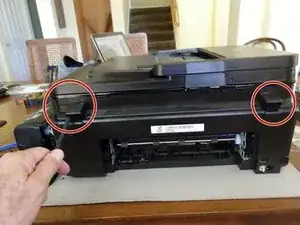
    • Pop off two covers in the back.

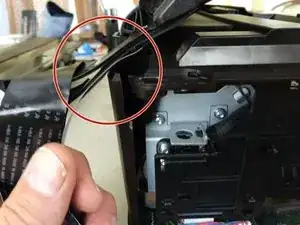
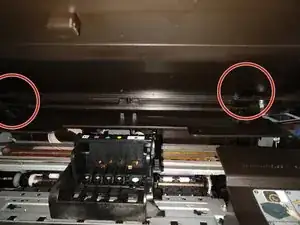
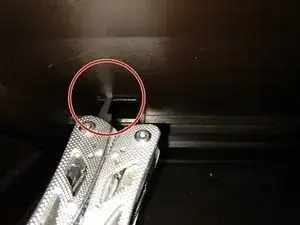
    • Unsnap the hinges. This is tricky. Gently push the top assembly up. This will create a small gap between the hinge and the top. Slide a thin prying tool into the gap and pull gently down to release the hinge.

    • Once unsnapped, pull the top assembly away from the hinges. (You did carefully move the cables to the back before this step, right?)

  6. AsF1B3M6KDU4dLSj
    AsF1B3M6KDU4dLSj
    QPDUkNkvLwA1EPsD
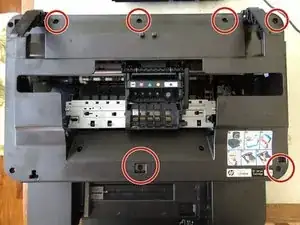
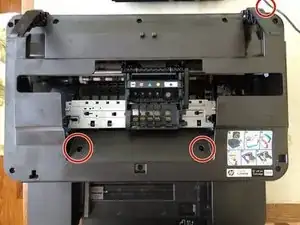
    • Remove 6x 15mm screws

    • remove 3x 10mm screws, the third one is on the back.

    • disconnect the red/blue cable from the motherboard on the side and unhook from guides.

    • lift off top

    • Remove right side

  7. eKRu4OTo6cmvUyGm
    • Disconnect the front panel from the motherboard

    • Remove 2x 15mm screws.

    • Lift out front panel

  8. yAgxQKHKynMehHhp
    yAgxQKHKynMehHhp
    oTWeiKeXPFQhnsTg
    vgHVbfTg5VWs51ch
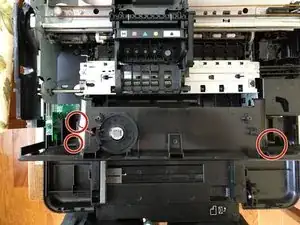
    • Remove 4x 15mm screws

    • Remove 1x machine screw and disconnect remaining cables..

    • Disconnect linkage

  9. NwRU1VAUMXD2fkTG
    NwRU1VAUMXD2fkTG
    Q3APrXNogfmoGCXt
    BVCR5SnsOVcKNZ2c
    • A lot of tubing needs to stay connected. If it comes loose, it's really messy and hard to do.

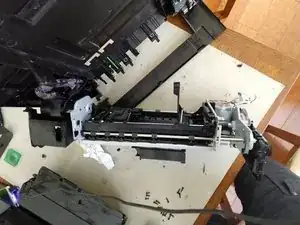
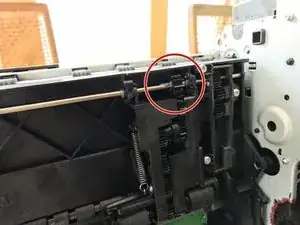
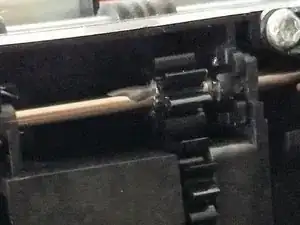
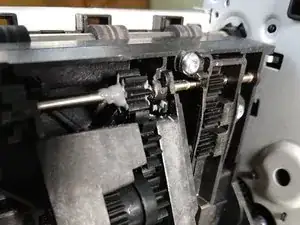
    • Position the printer like the picture shows.

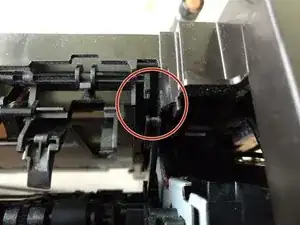
    • The second and third pictures show the location of the problem. I had tried the non-disassembly procedure, but it failed for me. You can see a glob of JB Weld.

  10. cPFXTXNnkMgWBpsJ
    • OK, I got you here. I'm going to try to:

    • clean off all the JB Weld

    • Slide the gear over

    • put a couple of drops of Superglue on the splines, push the gear back over the splines and let cure while I eat a sandwich

    • Mix up some JB Weld and ensure that I get it 360 degrees and both sides. Wish me luck!

  11. DZN2ENRLNEsPegB3
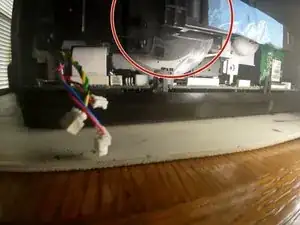
    • It's not much fun getting that printer engine back on. Put on you latex gloves.

    • Before you start, though, clean up those pinch wheels that grab the paper. alcohol, let dry, sandpaper them a little.

    • IMPORTANT: Get rotary-pulse encoder, the then clear plastic disk, needs to be clean and go into that "slot" (which is an opto-coupler, that counts the pulses.

Conclusion

The fact that you are here trying to fix this printer is a testament that, ultimately, it was the greed of the top level management that requires this fix.

Yeah, I had a really hard and messy time getting the print engine back in place. The epoxy hasn’t cured yet, so I don’t know if I fixed it or bricked it.

Gregg Ferry

Member since: 21/10/17

1427 Reputation

16 comments

Can this be fixed by cutting a hole in the bottom of the printer???

Kevin Hennelly -

Yes

The disassembly is not necessary. Using a soldering iron with a knife tip, I cut an access opening in the bottom of the printer. There is a long oblong (looks like)well directly beneath the stripped gear in the bottom panel of the printer. I cut the opening under there, the flat oblong feature on the bottom. Don't cut the structural reinforcing features.

Using a stiff wire, the superglue gel was applied to splines. The shaft can be rotated in one direction. Slide the gear over an let it harden, then carefully dab the gear sides only. Let it cure.

Total time under 45 minutes.

Greg Higuera -

Really difficult to fix.

But I didn't want to buy a new printer because of this little bug.

I'd rather fix things than keep buying new ones.

Achim Kehl -

It’s been a long time since I did this. The super glue and JB weld failed shortly. In subsequent attempts I bricked it.

Kevin, I like your thinking, but one would run the risk of causing more damage to the device.

Achim, I hear ya! Just this morning, for the second time, I super glued the lid to my teapot. Alas there is a lot of greed in this world. I bought a new printer and, it, too, is a crappy design (paper tray hangs up when I pull it out to put in more paper). Look into helping out at a RepairCafe/Restarters/FixitClinic event.

Gregg Ferry -

How I did this in 5 minutes: removed the paper, taped a small mirror on the paper tray bottom, turned the printer upside down, and dropped superglue drops on the spline, using the mirror to position. I added a few drops on the side of the repositioned gear but that might not be nessessary.

NOTE: make sure the due-ink-reservoir (underneath the parked cartridges location) is emptied with a cloth before turning the printer!

mijn -

Oooh! I like this much better! Where exactly did you tape the mirror and how small was it?

Katrina Meyers -

Sounds like a great idea, mijn! How did you get the cartridges out of the way to empty the due-ink reservoir? Screw HP.

Big Newton -

mijn, Please take the time to document your fix. It sounds much easier than mine. Every owner of this printer will benefit from it. Thanks for posting. … truly!

Gregg Ferry -

Hi

I cut a portion on the bottom of the printer to get at the gear.I was able to glue the gear and slide over on shaft.

Worked great for a few months that the gear broke.🤔

Unkljimmy -

@Greg Higuera. It is great how people improve this fixit. Please take the time to take pictures showing where to cut. Thanks!

OSD

Gregg Ferry -

same thing here. cut a 1.5" hole in the bottom for access. doesn't seem like that would cause a problem except maybe on pickup of last sheet of paper. i figured printer was toast either way so why not? my wife had done the superglue once before but it failed. now the plastic gear is split. idk if thats fixable. searched everywhere and i find no replacement gear, even on Aliexpress. i can see that it has 8 teeth, but i'm also not sure what material it is made from. maybe a 3-D maker out there somewhere can eyeball it.

kyle miller -

@khmiller It really sucks that that part is broken. The gear was probably one that was fabricated just for this printer, so finding a replacement will be nigh on impossible. Trust me, I know how frustrating this is.

But! You could design your own gear and 3D print it. As I remember the material is nylon (self lubricating). ABS might work. Make the shaft hole exactly the diameter of the shaft. Then when you force the gear over the splines, they'll cut into the gear and keep it fixed to the shaft (well, that was the design of the nylon gear... you might have to have the hole a skoshe bigger than the shaft, but just a skoshe :)

The challenge will be taking the printer apart and then getting the shaft to come off nicely. About step 8 or 9 take a lot of pictures of the ink feed tubes and make sure you get them back into place.

Best of luck

Gregg Ferry -

Maybe these gears are fit: https://www.ebay.de/itm/132104329234

wazul -

I'm not adept at fixing things, so I'll be buying a new printer even though everything else on this one seems to be working well. Hard to believe those so-called engineers at the supposedly great company of HP couldn't design a printer that would last for a decent amount of time. I haven't even used it all that much. One thing for sure, the next printer won't be any piece of crap from HP. They started in a garage, they should go back to the garage and figure out how to make products that don't fail way before they should.

Brad Rathernotsay -

Brad, please don't blame the engineers. I was at the "coffee talk" in Vancouver WA when Carlton Fiorina, the CEO at the time, told the audience (HP employees), "Stop making these things so good." This printer is the result of that edict. Similarly, the problems with the 737 MAX are a direct result of management cutting corners. I call this "sociopathic avarice"

Gregg Ferry -

Quite correct Mr. Ferry.

We tend to think in general terms, but this is also a livelyhood. I've had this printer for about 20 years, which is a lot of service, and this is the first serious issue. A normal engineer won't loose a good paying job for a printer that'll work fine for, say, 10 years.

The Boeing issue is quite different in scope, I mean, people are dead.

But I agree is the extreme consequence on giving up principles for money. There should be a line not to be crossed by the engineers and any other employee in that process. Anyone who understood this issue could cost lives, should've become a whistleblower and forget about the job, no matter how much it payed.

Yes, really.

juliobro1 -