Introduction
If your GE front load washer halts during a cycle or fails to spin, use this guide to diagnose the error codes, run forced spin tests, and replace the inverter board or other components if needed.
-
-
Confirm the washer is powered on with no cycle selected and the dial not pressed.
-
Press and hold the start pause button about 10 seconds until the lights flash and the display brightens.
-
Press start pause repeatedly to scroll through stored error codes for diagnostic clues.
-
-
-
Press start pause to exit error code mode and return to standby.
-
Press and hold start pause while rotating the control dial 180 degrees counterclockwise.
-
Release the button when the lights flash, then rotate the dial clockwise to mode 14.
-
Shut the door, check water and drain connections, and press start pause to initiate spin.
-
Observe if the drum spins only four to seven seconds, indicating a failing inverter motor assembly.
-
-
-
Disconnect power to the washer to ensure safety.
-
Gather a Phillips head screwdriver, a 14 mm socket wrench, a door boot spring tool, needle nose pliers, and a multimeter.
-
Tilt or secure the washer as needed to safely access internal components without tipping.
-
-
-
Pull out the dispenser drawer fully and press the tab on its left side to remove it.
-
Locate five screws in the dispenser housing three on the left and two on the right, and remove them with a Phillips driver.
-
Lift the console interface up about 15 degrees and pull it forward to unlatch from the bulkhead.
-
Remove three screws behind the interface along the top edge of the washer lid.
-
-
-
Slide the top panel toward you while lifting it up to release it from the washer.
-
Set the top panel aside to reveal internal components such as the accelerometer and harness.
-
-
-
Locate the accelerometer near the top with a small wire harness attached.
-
Ensure the harness is firmly connected and shows no broken or loose wires.
-
Replace the accelerometer if error codes persist despite secure connections.
-
-
-
Open the washer door and remove two Phillips screws securing the plastic face plate on the right side.
-
Remove two more screws securing the door lock and lift it out through the door opening.
-
Pry away the door seal retaining wire with a thin screwdriver and roll the gasket off the front lip.
-
Disconnect the door lock harness and inspect wires for damage or breaks.
-
-
-
Tilt the washer back to remove three bottom screws holding the front panel, then return the washer upright.
-
Remove nine top screws from the front panel with two at the corners and seven pointing downward.
-
Slide the damper fan assembly rearward if equipped and decouple it from the bulkhead.
-
Lift and pull the bulkhead forward to free it from the machine, watching for harness wires on both sides.
-
-
-
Examine both door lock harnesses for bent broken or snapped wires that could cause lock errors.
-
Use a 14 mm socket to remove four bolts from the lower concrete counterbalance weight.
-
Pull the counterbalance weight off its pegs and set it aside for more access to the drain pump and inverter.
-
-
-
Spin the drain pump impeller by hand and feel for three or four strong points of magnetic resistance.
-
Measure about 20 ohms across the pump terminals using a multimeter to confirm functionality.
-
Replace the pump if it shows no strong resistance or an open reading on the meter.
-
-
-
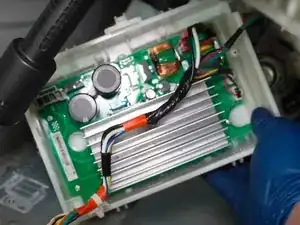
Locate the inverter assembly on the lower portion of the machine behind a plastic cover.
-
Use a small screwdriver or pliers to release six tabs securing the inverter cover then lift it off.
-
Unplug four wire harnesses from the inverter board and free any cable ties or wire trunks.
-
Detach two side clips and remove four screws to release the board from the plastic housing.
-
Seat the new inverter board in the housing align screws and clips and reattach the wire harnesses.
-
Inspect wires for damage around cable ties or connectors before replacing the inverter cover.
-
-
-
Guide the inverter board back onto the chassis and secure it with its mounting hardware.
-
Reinstall the counterbalance weight with four bolts while holding it in place.
-
Position the front bulkhead on its aligning pegs and secure with all top and bottom screws.
-
Reconnect the door lock and door gasket then seat the wire retaining spring around the gasket lip.
-
Place the top panel reinstall the three lid screws and fasten the console with five dispenser screws.
-
Restore power clear error codes in diagnostic mode and run a spin test to confirm the repair.
-
This procedure addresses the most common causes of a GE front load washer halting mid cycle, with emphasis on the inverter board and other potential faults. Confirm no further error codes appear and your washer now completes cycles without interruption.