Introduction

This guide will demonstrate how to open the top unit of the Keurig K40. It will also demonstrate how to remove and replace the top water pump from a Keurig K40 device.

  1. 4l4QBWBFhEhrO5Zy
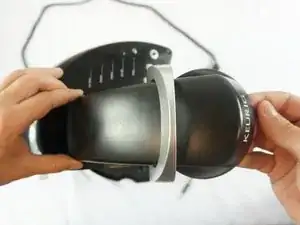
    • Begin by removing the top cover from the device.

    • Remove the cover by gently rocking it back and forth with an emphasis on lowering the left side underneath an internal peg.

    On our K50 Elite, the lid is held on with 2 screws, and two tabs (which I broke off) near the rear. I think to remove the lid, you first take out the 2 screws, under the cover on the front, and then slide the lid backwards to clear the tabs. I attached the rear of the lid by 2 spots of hot glue where the tabs used to go. I also removed the handle before removing the lid.

    texboydmoore -

    Thanks guys, this was super helpful

    Caleb Baker -

    Same with my k40, have to remove two small screws in top front than slide top back. Came right off. After I tried rocking for 1

    Half hr .

    jamesmurphy952 -

    The K40 unit I was trying to fix was leaking from the top inside the unit. When I took it apart (rocking did not work, there were two screws under the front and it slid back easily when they were removed) the curved piece with the reinforcement housing was loose so that water was pumped into the housing whenever coffee was being made. That resulted in a flooded counter and a tripped circuit breaker!

    I ran a zip tie from the crossbar of the reinforcement assembly to a brace on the tank and that made it much less likely to come loose and now the Keurig works as it was meant to do.

    Betsy Knutson53 -

    Clarification: The curved piece of tubing with the reinforcement housing was loose.

    Betsy Knutson53 -

  2. xWXpAAgNYQtbjejF
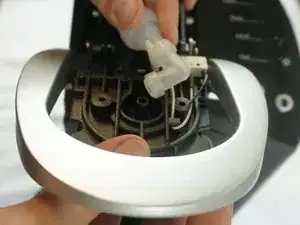
    • Unscrew both 1.5mm screws located on the water pump.

    That is not a water pump- it i a check valve!

    Paolo Alberto -

  3. 2agSoYhNyiIFV6gH
    2agSoYhNyiIFV6gH
    Uo4P1OXtVdui3rQU
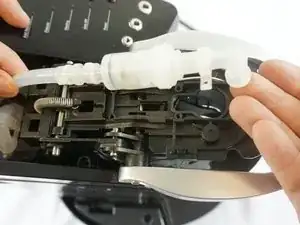
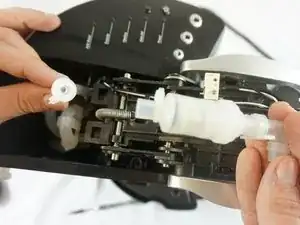
    • Keeping one hand firmly placed on the device, tug upwards on the water pump until it is separated from the device.

    • The water pump and pipe should now be loose and easy to move as shown.

    *before tugging upwards on the elbow tube, which is currently slid onto a black hard plastic tube, there is a compression ring made of similar clear tube material that should be slid up, so that the compression ring is NOT compressing that clear tube on to that black hard plastic tube. When the compression ring is slid up and not compressing anymore, it will be much easier to pull the elbow tube off (and put on) [I think I used x2 spoons to get down in there and evenly pull/slide the compression ring up. Note: I gently used a flat screw driver to put the "flat" at the very bottom edge of the clear tube to help slide it off and use the screwdriver like a teeter-todder which helped push the clear tube up, as I pulled the elbow tube off. -When ready to install, slide the clear tube back onto the black hard plastic tube all the way down, and THEN slide the compression ring down onto where both tubes are now overlapping, ensuring the clear tube is compressed by the compression ring onto the black plastic tube.

    John Smith -

  4. o1pPQwoFNgmXXXZS
    o1pPQwoFNgmXXXZS
    CxfUHjmoJkDo5F3S
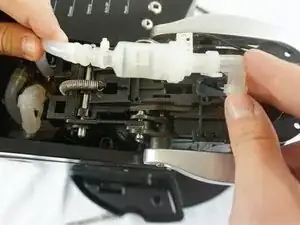
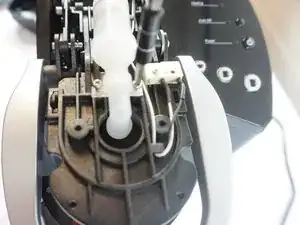
    • Pull on the point where the pipe meets the water pump.

    • The pipe will come loose and the water filter will be free and ready to be replaced.

    My keurig doesn’t pump any water what is wrong

    mastahl -

    What you just pulled out is NOT the water pump, nor is it a filter.  It is a check valve,.  A check valve a device that allows water to flow in only one direction.

    The filter is located in the external water tank.  The pump is located inside the Keurig and is not readily accessible.

    Elmo -

    Great guide but I think it should be renamed… It’s not a Pump that this guide talks about, it’s a Check Valve.

    Monte87 -

Conclusion

To reassemble your device, follow these instructions in reverse order.
Andrew Bornemann

Member since: 08/02/16

488 Reputation

5 comments

I NEED ONE OF THESE! Where can I find one????

G Steve -

This is a check valve, not the water pump.

Rick Koen -

Please rename this article. The item is not a water pump.

tvyse46 -

I viewed this to replace the pump. But after the checkvalve was replaced through these instructions my K40 works like new. Thank you.

Glenn Stanley -

After 4 months of storage, my Keurig didn't operate correctly when I tried using it again. The "add water" blue light, the "heat" red light and the middle "coffee cup" blue light, all x3 lights, blinked together... and the unit was seized up it seamed when I would try using it. After pulling the bottom apart and checking all those tubes, I found this web page, and then put the bottom back together again, and removed the top part to get to the "water pump" [check valve actually], and blew into it; it was completely seized. I blew a short spurt really hard un-siezing it. That's all it took. It was stuck from being in storage, dried out and sealed as it dried out. I put everything back together and I had to run the unit a few times until everything worked as it should. I really enjoyed this thread and everyone's collaboration, as it solved the root of my problem, which I couldn't find resolution anywhere else. Thanks a bunch! Don't forget to click on and read the detailed comments people wrote for each step...

John Smith -