Introduction
This guide provides step-by-step instructions for replacing the battery in a Lenovo Ideapad 120s.
If your laptop is no longer holding a charge, experiencing reduced battery life, or failing to turn on, replacing the battery may restore its functionality. A new battery can help resolve power-related issues and extend the lifespan of your device.
Before you begin, power off your laptop, unplug it, and press and hold the power button for a few seconds to discharge any remaining electricity. Gather the necessary tools and a compatible replacement battery (5B10P23779). You will need an iFixit Opening Tool, a Phillips #1 Screwdriver, and a T5 Torx Screwdriver(as suggested by a user).
This repair is moderate in difficulty and should take approximately 30–45 minutes to complete.
Handle the battery with care to avoid punctures or damage that could cause leaks, swelling, or overheating. When disposing of the old battery, follow local regulations for electronic waste.
-
-
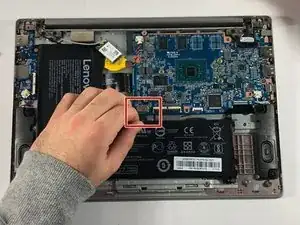
Carefully unplug the battery connector from the motherboard by gently pulling it straight out.
-
Using your screwdriver, remove the 5 screws holding the battery in place.
-

To reassemble your device, follow these instructions in reverse order and don't forget to reconnect the battery to the motherboard before securing the back cover.
Remember to handle the battery carefully and dispose of the old battery following local regulations.
One comment
good but its a torx 5 bit, not a 3mm phillips