Introduction

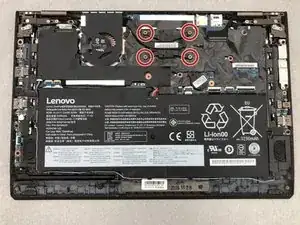
This repair guide is to remove, clean, and replace the cooling fan system on the Lenovo ThinkPad X1 Yoga (Model Number: 20FQ005YUS). The cooling system is very important to keep the computer functioning smoothly. If your computer is running slowly, overheating, or the fan is loud, it is time to clean or change the cooling fan system.

After Step 4, you will need to reapply thermal paste. Please refer to this guide on how to do that.

  1. ddnAPKxuKSHJ1vyS
    ddnAPKxuKSHJ1vyS
    h52VZyjxom3o2N5Y
    UfOICHUfQXFPQ1lY
    • Be sure to power off and unplug your device before you begin your repair.

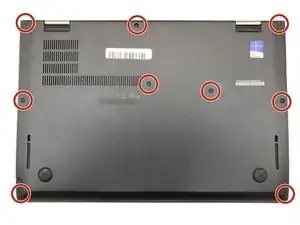
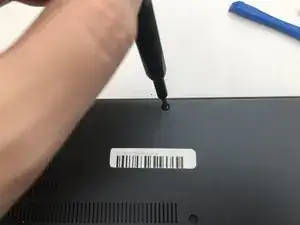
    • Flip the computer over so the bottom is facing up.

    • Remove nine 4mm Phillips #1 screws from the bottom of the computer.

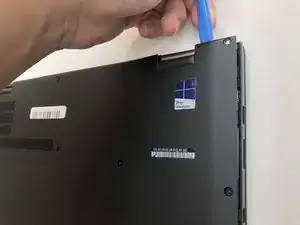
    • Use an iFixit opening tool to pry the back cover off of the laptop.

    Bei der Variante mit integriertem UMTS-Modul die SIM-Karten-Schublade herausnehmen, sonst klemmt die beim Abheben der Gehäuse-Unterseite!

    Fxuser -

    Pry from the side of the hinge first.

    Dante Horatio -

  2. iSJKuMcLJwwwPYxW
    • Remove four 4.5mm Phillips #1 screws from the corners of the heat sink.

    CAUTION you will need to re-apply thermal paste to the CPU and GPU if you remove the fan.

    This step is not necessary if you are only trying to access the keyboard and trackpad, or remove the monitor. If so, the steps of removing the Wifi and SSD are also not necessary. Skip to Step 16 Motherboard.

    Dante Horatio -

  3. guofjcqEeCpTgFXb
    guofjcqEeCpTgFXb
    R6DCYCVS3s5uHKmZ
    FmhUEjjiLj4YveSS
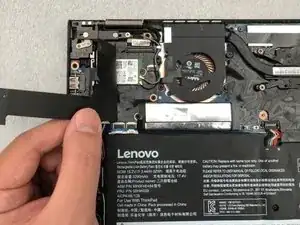
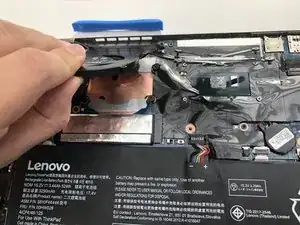
    • Gently peel back the black plastic covering around the fan.

    • You may hear or feel the adhesive pulling away here.

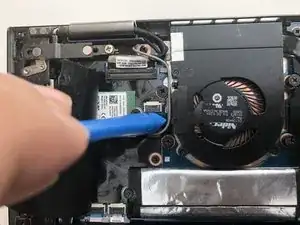
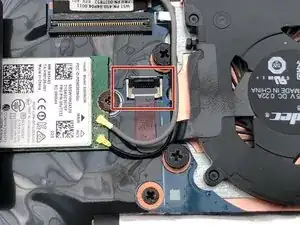
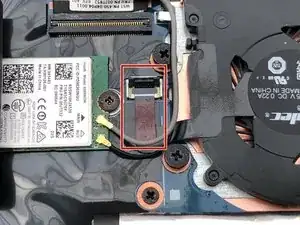
    • Using an iFixit opening tool, flip up the small black cover of the fan plug.

  4. 52gxk1PdOGy2OotE
    52gxk1PdOGy2OotE
    V1hDf1SQm6PdKK5Z
    • Using tweezers, pull the plastic strip out.

  5. StocvPucrZi5YKLW
    StocvPucrZi5YKLW
    gA1CxOJDjN5JyoAd
    • Remove the fan from the computer.

    How does the user remove the fan?

    Sandy Branham -

    ****** BEFORE re-assembly
    1- clean material off of cpu (careful!)
    -- use a tool with a dull edge to scrape away the thermal conductive paste on the processor and the heat sink (the processor is the chip under the heat sink, the heat sink is the x shaped assembly that is attached to the fan

    2. apply a fresh coat of NEW thermal paste to the processor, then re-mount the heat sink
    -- google "applying thermal paste to CPU" for hints and tips about the right amount of paste to use and the correct ways to apply it.

    eric jmail -

    Really bad advice! For anyone who's reading, you DO NOT need to remove the fan (or heatsink)! The motherboard can be removed as a whole. This is a totally unnecessary step.

    Mahmoud -

Conclusion

To reassemble your device, follow these instructions in reverse order.

Katrina Ternus

Member since: 07/09/19

595 Reputation

0 comments