Introduction

Use this guide to replace a broken or cracked top shell on your Logitech MX Master 3S mouse.

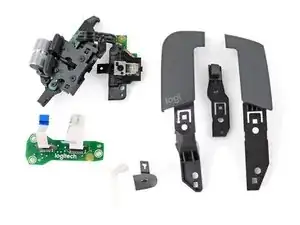
The replacement part only includes the plastic shell housing itself, without any parts or screws. You'll need to remove and transfer all the parts from your old shell to the new one.

  1. qiRvYtHjG2HjDoPT
    qiRvYtHjG2HjDoPT
    AF2uNp6RZmp3LGDm
    m2ZvHhq1NV63ri6T
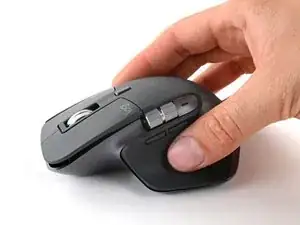
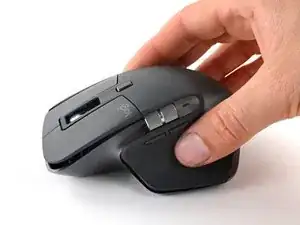
    • Flip the mouse's power switch into the OFF position, unplug any cables, and flip it over so the feet are facing up.

    • The unique shape of some mice can prevent them from laying flat. If you need to, lay your mouse on a soft towel to prevent wobble.

    • If you're planning to reuse your existing mouse feet, note that the adhesive needs to be thoroughly heated for them to be cleanly removed.

    • Heat an iOpener and apply it to each of the mouse feet for about one minute each.

    • Alternatively, you can use a hair dryer to soften the mouse feet adhesive.

    • When using a hair dryer, don't heat the feet for more than a couple seconds at a time—anything hotter than just warm to the touch risks melting or warping the plastic lower case.

    • The information sticker adhesive may soften during this step, but you don't need to remove it.

  2. eGkqhNgxWtWXWJXZ
    eGkqhNgxWtWXWJXZ
    PJIDmuaMREE2W5Kd
    klMXDhCBWI5DsYaO
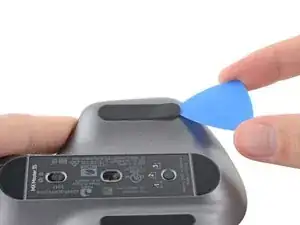
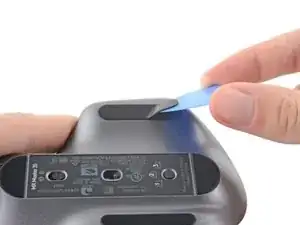
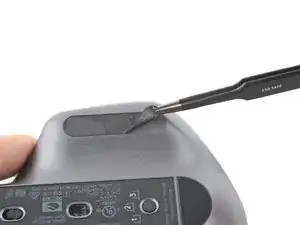
    • Slide an opening pick under an edge of the left mouse foot.

    • Go slowly, and make sure the pick slides underneath both the foot and its adhesive pad. These layers separate easily.

    • If you plan on reusing your mouse feet, be careful not to crease them or separate them from their adhesive pads.

    • If the foot feels stuck, apply more heat before continuing.

    • Slide your pick under the foot to separate its adhesive until you can grab it with your fingers.

    • Peel up and remove the left mouse foot.

  3. eKE1XtZmqisyZGun
    eKE1XtZmqisyZGun
    jMFCfncssstegKjl
    32NRfiEDBjZIGnNs
    • Repeat the previous two steps for the three remaining feet.

    • The front foot doesn't cover any screws—if you're only removing the mouse feet to open up the mouse, you don't need to remove this foot.

  4. oWXG2CsTDINFSF63
    oWXG2CsTDINFSF63
    ndCu6ruFeeaC1OyD
    AUbpMaLD6kZQxWWU
    • If the adhesive separated from the foot:

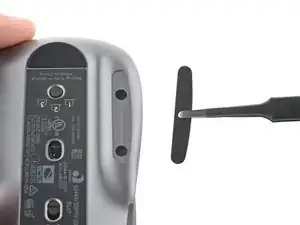
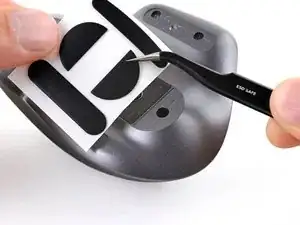
    • Slide the flat end of a spudger under an edge of the adhesive. If the adhesive seems stuck, you may need to heat the adhesive further.

    • Use a pair of tweezers or a spudger to remove any large chunks of leftover adhesive.

    • For installing new mouse feet or reusing your old ones:

    • Thoroughly clean the bottom of the mouse with isopropyl alcohol and a lint-free of microfiber cloth. Allow the surface to dry completely.

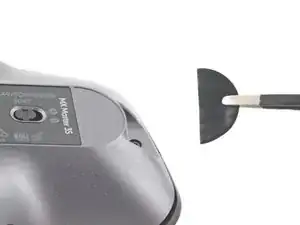
    • Peel your new mouse feet away from their adhesive liners and press them firmly into place.

    Why are we removing leftover adhesive if we went to the trouble of heating for full removal (and reuse)?

    This makes no sense. Might as well just rip em off!

    craigalanelliott -

  5. YqdybUP5WO1ZBNXV
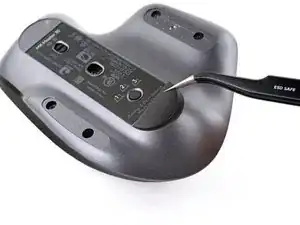
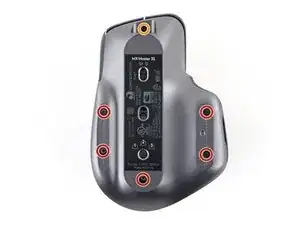
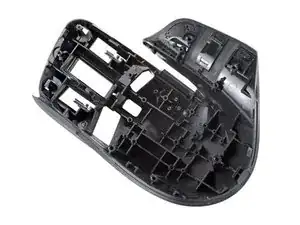
    • Use a Phillips screwdriver to remove the five 4.3 mm‑long screws securing the bottom half of the lower case.

    • Use a T5 Torx driver to remove the one 4.2 mm‑long screw securing the top half of the lower case.

    El texto del segundo paso está mal. Se repite con el primero.

    Manuel Sánchez -

    Whats the circumference of the screws? You just talk about the length.

    phonc -

  6. QQmRTuGgvByAKoYD
    QQmRTuGgvByAKoYD
    cLjZsAri6FWhjuWO
    E4Jo5uGGUNbXaHtG
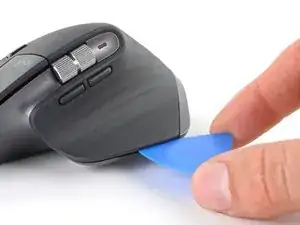
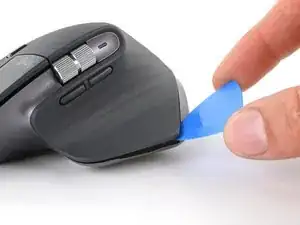
    • Insert your opening pick into the seam between the thumb rest and the lower case.

    • Slide your pick right, towards the rear of the upper shell and pry upward to release the left clips.

  7. JlSUBXoLiVcsVvBP
    JlSUBXoLiVcsVvBP
    jAI3IsJRAMrF5wrO
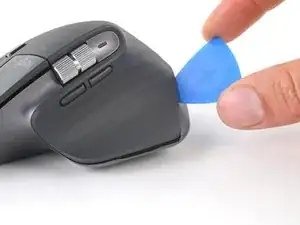
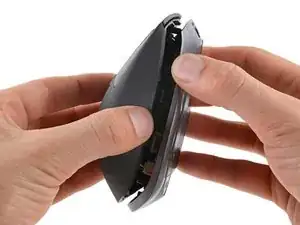
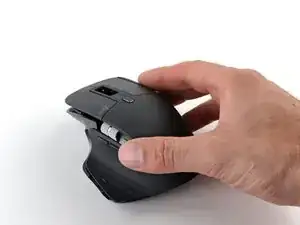
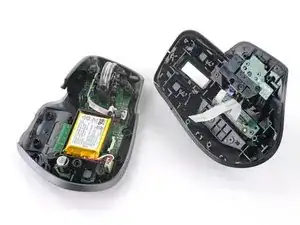
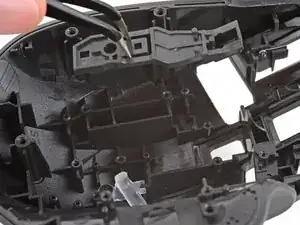
    • Gently pry the upper shell and lower case apart to release the clips on the right side of the mouse.

    • Don't try to fully remove the top shell just yet—another clip and a delicate cable connect the upper shell to the lower case.

  8. wTh5HNHWUnUf6SKI
    wTh5HNHWUnUf6SKI
    OUMjfF2qQxnyVMEN
    nVB3KRhRjva1wKQT
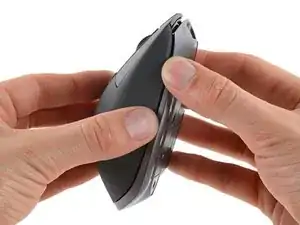
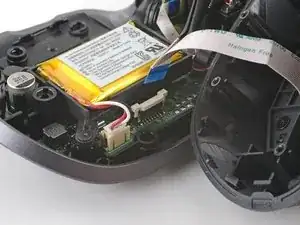
    • Lay your mouse down onto your work surface, making sure none of the clips re-engage.

    • Grasp the upper shell and partially lift up the right edge.

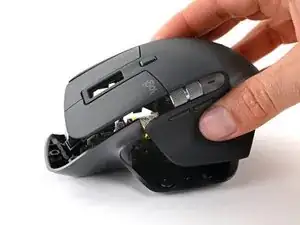
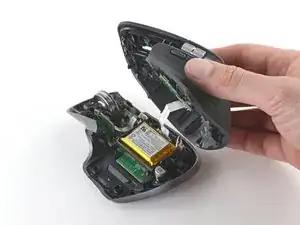
    • Pull the upper shell up and back to release the final clip and separate the upper shell from the lower case.

    • Still keep the two halves close together—a cable is still tethered to the upper shell.

    • To reinstall the upper shell, slide the front edge into place first, then press down around the perimeter of the upper shell to engage the remaining clips.

  9. JRWYhj4eKnZjeIsv
    JRWYhj4eKnZjeIsv
    1AZuudhJMVpR6Zba
    y3VlGXDQbrxOyXZC
    • Be careful not to strain the cable connecting the upper shell to the lower case.

    • Lift the upper shell away from the lower case and lay it to the right of the mouse.

  10. yLfaeMRqkTBhZ6TM
    yLfaeMRqkTBhZ6TM
    TrkKtwUQbTicYXAl
    CIVgyUUQgowanPZZ
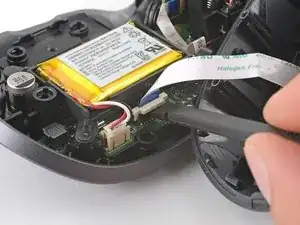
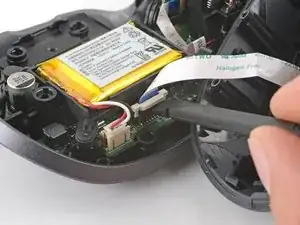
    • Use the flat end of a spudger to gently lift up the sliding lock on the interconnect cable socket.

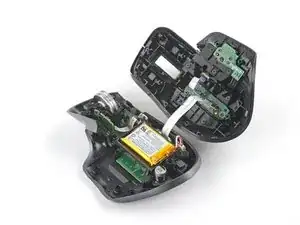
    • Slide the cable straight out of its socket on the motherboard.

    • During reassembly, insert the cable into the socket with its blue tab facing out, then push down the sliding lock to secure the cable.

    How many pins of the cable?

    Harid Wongpanitlert -

    The lock broke trying to reinsert the ribbon cable. Be careful.

    Garrett Vogele -

  11. r1DmeNKu3f5Wf6CJ
    • Remove the upper shell from the lower case.

    Dear Logitech, please support the upper Shell as replacement Part (without doughter-boards)

    FusterCluck -

  12. UTRJgJiFGcB5M3DC
    UTRJgJiFGcB5M3DC
    UWEUlqHl5MOAsUbI
    J5JXLMl5uyQwOVLB
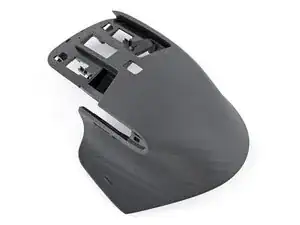
    • Lay the top shell upside down on your work surface.

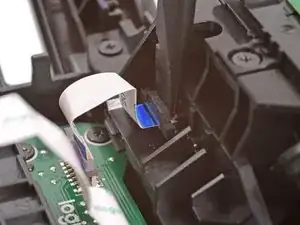
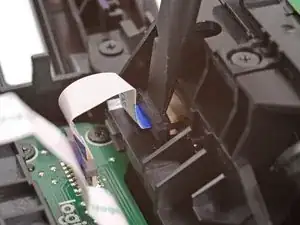
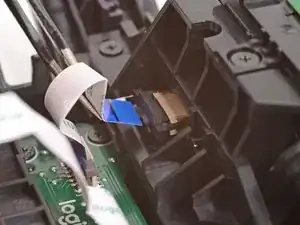
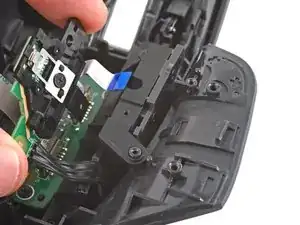
    • Use the flat end of a spudger to push out the plastic latch on the connector near the right side of the shell.

    • You should feel the latch pop into the unlocked position. Don't push too far, or the latch may come completely off the connector.

    • Use tweezers or your fingers to gently pull the cable straight up and out of its socket.

    • The cable should come out easily. If you feel any resistance, push the latch out a little more and try again.

  13. GDFV5THabhx5JDEV
    GDFV5THabhx5JDEV
    WJcDkiU5ygHZHIT3
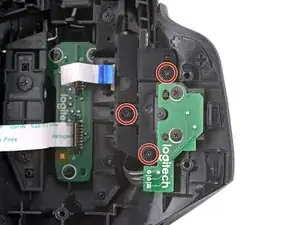
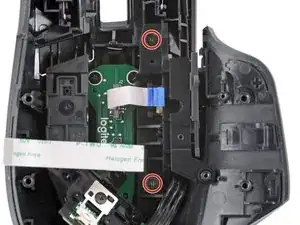
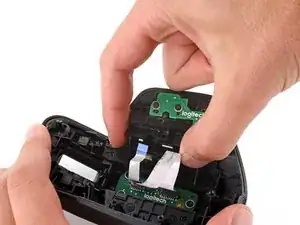
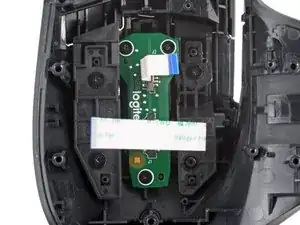
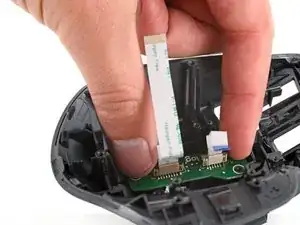
    • Use a Phillips screwdriver to remove the three 3.5 mm‑long screws securing the gesture button board assembly to the underside of the thumb rest.

    • Don't remove the two smaller screws in the board itself.

  14. ZDEe4UWMuFW1onlE
    ZDEe4UWMuFW1onlE
    MF1YMS5xGpCQATVY
    OZJACXTptMSHXfoI
    • Don't try to fully remove the gesture button board assembly. It'll be removed together with the horizontal scroll wheel assembly in a few steps.

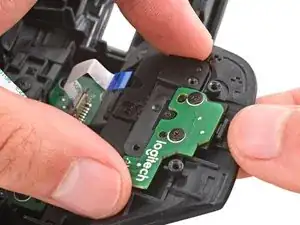
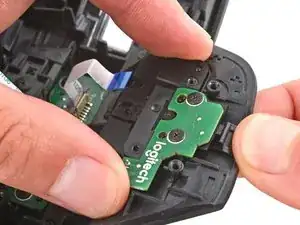
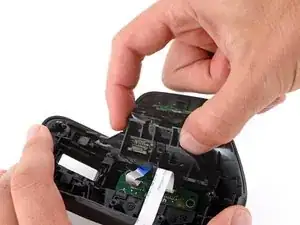
    • Push down the outer edge of the thumb rest to unclip the right edge of the gesture button board assembly.

    • Lift the assembly off its alignment posts and pull it towards the center of the shell.

  15. rMoVWZRSULJTnw3I
    rMoVWZRSULJTnw3I
    OjHMeC6PAZJPDTuM
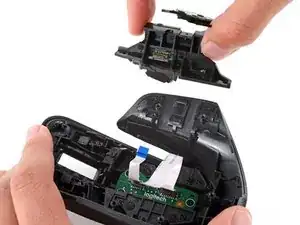
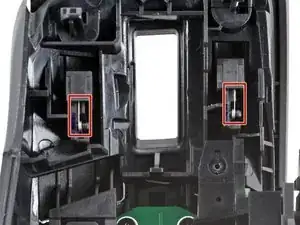
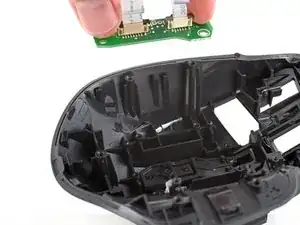
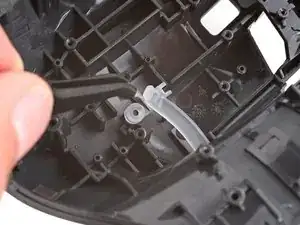
    • Use a Phillips screwdriver to remove the two 3.5 mm‑long screws securing the horizontal scroll wheel assembly.

    How big are these 3.5mm long screws? As in, what diameter

    phonc -

  16. JAumeGCCIuI4nZl6
    JAumeGCCIuI4nZl6
    nppFWALoIE1CEKY2
    MP34EdLL4EHHqlOE
    • Removing the horizontal scroll wheel assembly is tricky and may take a few tries—be patient and work slowly.

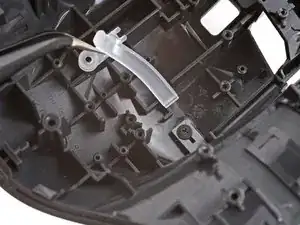
    • Firmly secure the top shell with one hand.

    • Use your free hand to rotate the horizontal scroll wheel assembly away from the shell and lift to remove it.

    • During reassembly:

    • Make sure the cables in the center of the shell are out of the way so they don't get trapped under the horizontal scroll wheel assembly.

    • Put the assembly back into place so the horizontal scroll wheel and side buttons go into their slots and the plastic housing's circular cutouts go over their pegs.

  17. btmMQHSkNiAhXfyq
    btmMQHSkNiAhXfyq
    vvFiQgfvV3PCqVtp
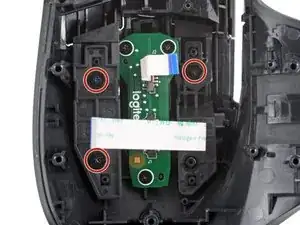
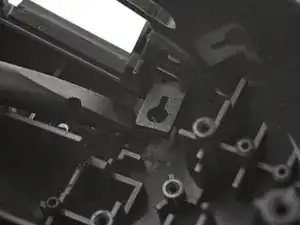
    • Use a Phillips screwdriver to remove the three 3.1 mm‑long screws securing the left and right click buttons.

  18. CcpNwcCtgG55YNPC
    CcpNwcCtgG55YNPC
    ESYJUGSVXyq5twUE
    mGckINjeeCguATGt
    • Be very careful not to lose the two small springs on either side of the scroll wheel cutout. Otherwise, the buttons won't click properly when the mouse is reassembled.

    • Use your fingers to remove the left and right click buttons.

  19. eIlojJkoKSEqAtbk
    eIlojJkoKSEqAtbk
    JuOXGlhNRjXBgZol
    • Use a Phillips screwdriver to remove the three 3.5 mm‑long screws securing the scroll mode button board.

  20. 5LjqlvJkkyS4OmMl
    5LjqlvJkkyS4OmMl
    KxoOsTvifmKePMdU
    • Use your fingers to gently lift and remove the scroll mode button board.

  21. POu2kLPy2wejVOVg
    POu2kLPy2wejVOVg
    DMBNJuRVRLREvCIC
    • Use a Phillips screwdriver to remove the 3.1 mm‑long screw securing the scroll mode button.

  22. TP3tQjyqmiElcjyo
    TP3tQjyqmiElcjyo
    COp5Z4hSCPKBCURL
    • Use tweezers or your fingers to lift and remove the scroll mode button.

  23. mAO6KSlaIhu16Pqq
    mAO6KSlaIhu16Pqq
    5RyoKoxlHMaqsFSQ
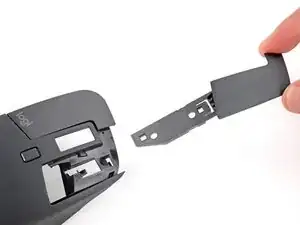
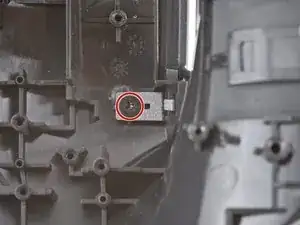
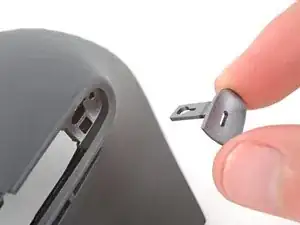
    • Use a Phillips screwdriver to remove the 3.5 mm‑long screw securing the battery status indicator.

  24. AFIb1Yrqe5cpiXQX
    AFIb1Yrqe5cpiXQX
    RMRTDtQfRuCMeXi6
    DQu6bF3CxoiCZFn5
    • Use tweezers or your fingers to lift the battery status indicator off its post and remove it.

    • During reassembly, insert the indicator into its slot on the edge of the shell and then lower it into place so the screw hole goes onto its post.

  25. 3MSyKxGeYhqgCTYu
    3MSyKxGeYhqgCTYu
    AGyeK3JTZsu5SsFm
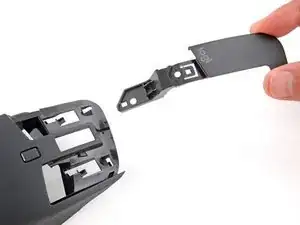
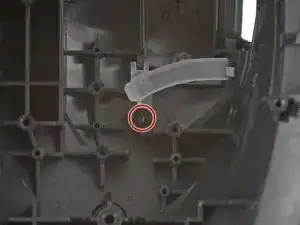
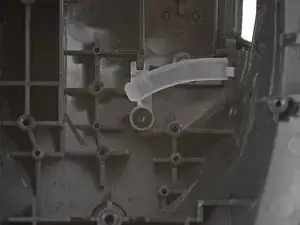
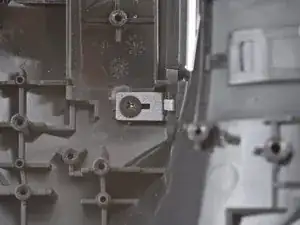
    • Use a Phillips screwdriver to remove the 3.4 mm‑long screw securing the battery status indicator housing.

  26. SRnF31s1LtcBcKxS
    SRnF31s1LtcBcKxS
    EDD3iLKNMAlVBvSk
    JGPdFADe3yTgSHYc
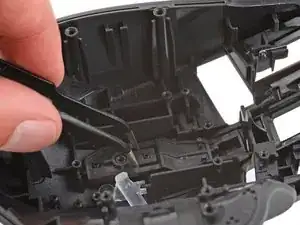
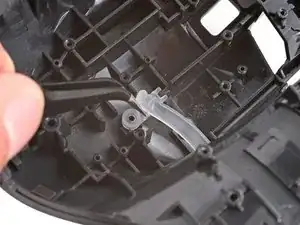
    • Use the flat end of a spudger to lift the battery status indicator housing off its post and unclip it.

    • If you're having trouble, use a spudger to push in the housing's small clip.

    • Remove the housing.

    • During reassembly, push the housing into its cutout until it clicks into place.

  27. ZRGNeCaCAMWZLCSg
    ZRGNeCaCAMWZLCSg
    u2AOCQgVk6GbtuVL
    Wo3XfGWcCdYJpT16
    • You're left with the top shell.

    • During reassembly, you'll need to transfer the parts you removed from the old shell to the new one.

Conclusion

To reassemble your device, follow these instructions in reverse order.

Take your e-waste to an R2 or e-Stewards certified recycler.

Repair didn’t go as planned? Try some basic troubleshooting, or ask our Answers community for help.

Spencer Day

Member since: 14/09/22

95592 Reputation

5 comments

Hello. Interesting guide. Where can I buy the top shell? I can't see any option to purchase it. Thanks.

Alan Naïve -

For anyone here with the clicks being less responsive after using it for a while (I used it for a few years before this started happening), I found that after removing the top shell and getting to the switches, and clicking the switches with isopropyl alcohol cotton swab for several times (loosening the dirt between the switch button and the switch body) and drying it, and reconnecting it worked relatively well.

Jun Sung Kim -

Hi, this guide is great, but where can we get a replacement shell?

Chris Jung -

Where is the replacement shell available?

Nick Maskell -

Really really wish a replacement shell would be available from iFixit - it would be an instant buy from me. Honestly if Logitech cares about replacement parts at all they need to make this available. The MX3 top shell is known to get damaged quickly. I have a 3 and a 2S - the 2S looks almost brand new and the 3's shell is breaking down. I'm not buying a $130+ CAD mouse from Logitech again only for this to keep happening with no replacement options out of warranty.

Andre Lapointe -