Introduction

This is an old version of this guide. See the new version for the most up-to-date process.

  1. ULxmrMHFFanBhMJs
    ULxmrMHFFanBhMJs
    OdlUVBhKv2oecfMM
    tdIbYJvAmbl4yG1H
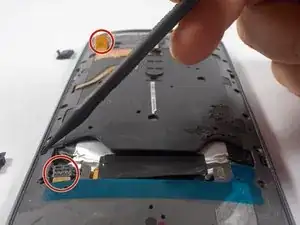
    • Disconnect the two battery connections.

    • Remove the two parallel black tabs by pulling on them.

    That little wavy orange strip on the left connects the volume and on buttons. Make sure to detach it from the battery before following the next steps, because it’s very easy to damage.

    Rodrigo Vidales -

    the black tabs are internal between the back plate and battery. they cannot be removed without removing the back plate. they are used to anchor the nfc antenna and require great care in handling. they should be used to remove the nfc antenna after back plate removal.

    pic gla -

  2. HGqGMoMaHdUILb11
    HGqGMoMaHdUILb11
    JjqfOdaBGt4ciH4H
    UNgklIyNeMW3Sc2J
    • All screw lengths are 2.5mm

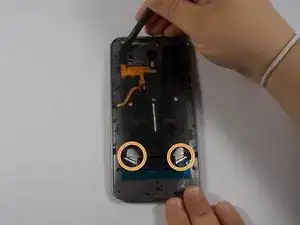
    • Using the T3 screw driver, remove all 20 T3 screws.

    • Do NOT remove the silver screw circled in orange.

    • This holds in the Power/Volume buttons and is not necessary to remove. There are 2 very tiny springs behind the volume buttons that are easy to lose if you remove this screw.

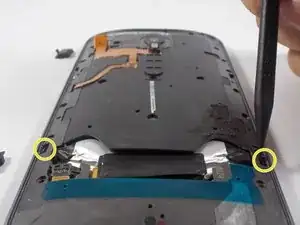
    • Using the nylon spudger, remove the two clips holding the panel in place.

    There are two screws by the upper battery connector, (included in the 20) that are not circled in the image.

    gripworks -

    According to the designations on the tool set, the torx screws in my MXP are T3, not T4.

    hopetocover -

    They are T4. My T4 fit fine, but boy are they in snug. I had to apply a good deal of downward pressure while twisting to break them free and I still stripped out one that I had to drill the head off of.

    Jeff H -

    A T2 and a T4 driver will both fit a T3 screw, but not as well. These are definitely T3 screws. They are not snug and no downward pressure should be needed if you use a driver that actually fits.

    Here's an image with Screw #20 also circled:

    https://imgur.com/a/gxpSD

    [deleted] -

    Thanks for your comments everyone. I've never worked on this phone, but I added some additional screw markups and incorporated your comments for the benefit of the next person who reads this. Hopefully I got it right, but let me know if you see anything amiss!

    Jeff Suovanen -

    The middle screw at the top is located further left (quite right in the middle).

    Jörg R. -

    Evil T3 screws! Don’t force down, just apply torsion force. Increase it slowly. With luck, the screw will start to rotate. I was able to open with a not so good driver with a relative large body.

    Also, the point where the flat cable coming from the button meets the rest os the cable is glued to the battery. You have to detache it now, before trying to remove the battery or you may risk ripping the cable.

    Thank you all for the tips!

    Mr. Cage -

    Screws are definitely T4. Like others said. Either that or the manufacturer had variance for which they used on the production line. T3 head did NOT work and was stripping the screws. T4 head worked perfectly.

    I’ve never had problems with this torx set in fitting, so it’s either variance in what the manufacturer uses in these phones, or the guide is wrong about what size screws they are.

    T4 screws in mine. If you try to use a T3, you’ll strip them. Don’t do that. I had to torque one of the corner screws out, along with its socket, because I started with the T3 head before moving to the T4 head. Mucked the !&&* out of that corner of the phone, but it still works.

    Otherwise, very good guide.

    Benjamin -

    and then magic happens. the author omitted carefully prying off the display from the back plate that holds the battery. this is a delicate task with risks. the photo shown in step 5 is the battery back, only.

    pic gla -

Conclusion

To reassemble your device, follow these instructions in reverse order.

Lucas Dos Santos

Member since: 06/03/16

1056 Reputation

0 comments