Introduction

This issue should solve issues with lights not staying on or very dim.
There is an excellent video on YouTube here.

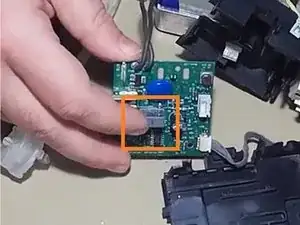
Here are the part details for the C1 capacitor on the PCB:

DigiKey Part Number: 399-5862-ND
Manufacturer Product Number: R463F310000M1M
Description: CAP FILM 0.1UF 20% 630VDC RADIAL

  1. MPoY4MakXdYmHp3Y
    MPoY4MakXdYmHp3Y
    TnPFMYS25JBsVatQ
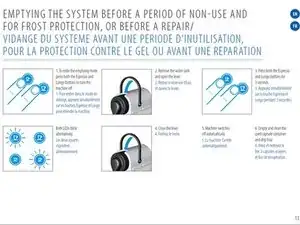
    • Remove all water from the system. (From the Nespresso manual.)

    • image 2: exploded view of the machine. Source: buyspares.com

    cuando pulso los botones,se encienden los dos haciendo pausas cada tres encendidos ,y no paran que puede ser el motivo ??, gracias

    moy5099 -

    Prueba esto: Apague la máquina, mantenga pulsado el botón derecho (vaso grande) hasta que el botón izquierdo parpadee 3 veces, listo. Si esto no funciona: Apague, desenchufe, espere 1min, enchufe y continúe como arriba.

    Si tienes mala suerte, esta es la causa: Nespresso CitiZ Capacitors Replacement

    VauWeh -

    Nello spaccato manca la parte che sta a contatto con le capsule e la leggenda con i numeri di riferimento dei pezzi.

    Riccardo Ricci -

  2. xSGehAuE54B6THDp
    xSGehAuE54B6THDp
    XffRFATeqFWY3BId
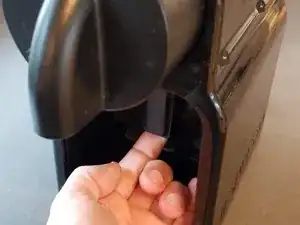
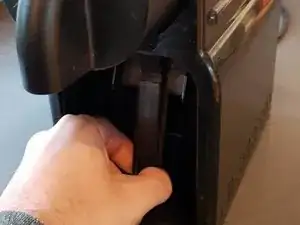
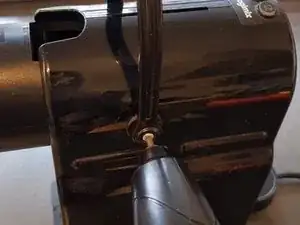
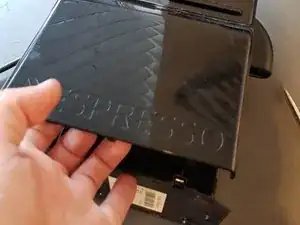
    • Pull straight forward with a fair amount of force.

    • Once you hear a click, pull the part straight down. This should go easilly.

    What is the name and part number of this part? Where can I buy a new one?

    VERONICA THUESEN -

    NN-300134 1-1-J made of ABS

    Markus -

    Lo siento no lo se, hay piezas que no estan a la venta sencillamente porque la demanda de piezas es muy pequeña o inexistente.

    Carlos López (España - Spain) -

    Bonjour

    Je ne parviens pas à remettre cette pièce en place. Une technique particulière ?

    Merci d'avance

    Nicolas -

    Ninguna, tecnica en especial, tan solo va encajada, si que es verdad que me costo un poco encontrar la posicion correcta, te aconse uses una linterna para ayudarte.

    Carlos López (España - Spain) -

  3. gKjEcPEJfHgGmfYk
    gKjEcPEJfHgGmfYk
    D5nxNseXTu2ZUySu
    • Use a T20 torx bit (star-shaped). A screwdriver that fits should work fine.

  4. oFiDeeWfaTnSRw3A
    oFiDeeWfaTnSRw3A
    teMNuUuYChdwhDil
    np5Lq5jyUwWVbBlI
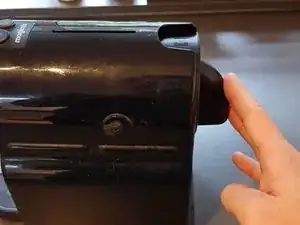
    • Close the cup-holder firmly.

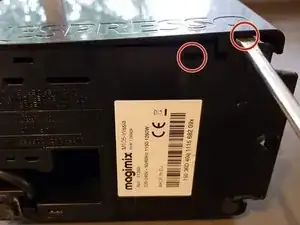
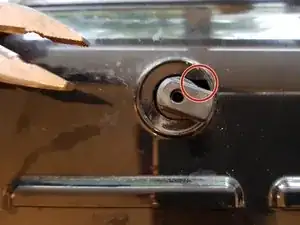
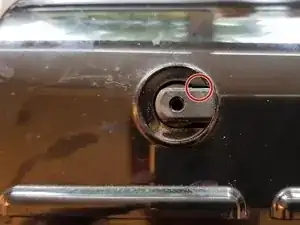
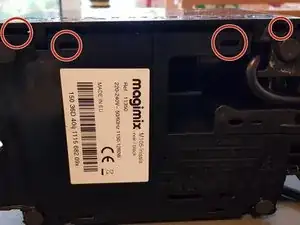
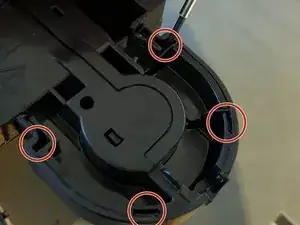
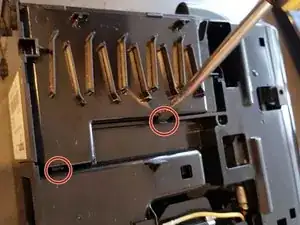
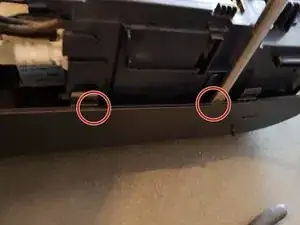
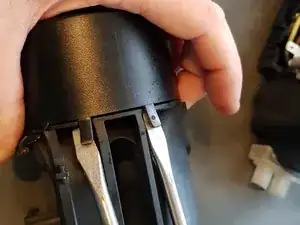
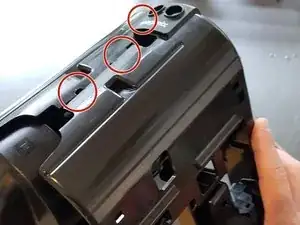
    • Photos 2 and 3, push the screwdriver in and wiggle a bit to undo the clips. There's a total of 4 clips.

    Il serait bien de préciser de quel couvercle latéral on parle : le droit ou le gauche ? Merci.

    Gilles Guérin -

  5. uCWTVZJAPMAdi5Hm
    uCWTVZJAPMAdi5Hm
    LQTZCZPb4uZGWSf5
    WCWUNhbpsijXum3R
    • Make sure the notch lines up.

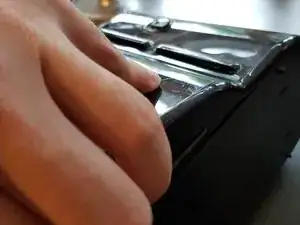
    • Pull the cover away. Once there's a little room, move your fingers up a bit and pull on the sides.

    This is quite delicate, scary and slow! There are more clips and the side can get stuck on the metal lugs that stick out the side. You may have to ease the plastic cover over them.

    Terry Cunnane -

    Use the handle, not pliers to align.

    Bob -

  6. 42dRvDvCYuAi2DX1
    42dRvDvCYuAi2DX1
    SyFEudYYWT51AKiF
    • Repeat on the other side

    La photo avec la main me semble trop zoomée. Un plan plus large serait plus explicite. Merci.

    Gilles Guérin -

    There are way more clips to disengage.

    Bob -

  7. 22UMgkfKZIgNLJJn
    • Insert wisdom here.

  8. PQpP2gMYkTKHcw3l
    PQpP2gMYkTKHcw3l
    NAOLuKhtHRsiBOtI
    R5Unq6RYgZEPTj1X
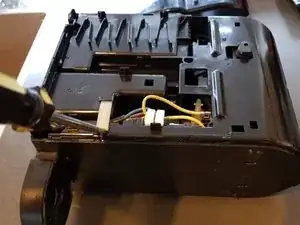
    • Unplug the device first! Remove ground, live and neutral wires.

    • Remove the whole wire from its slot.

    Stroom nooit laten zitten bij uit elkaar halen, dus dit had vóór stap 1 al gemoeten.

    paul -

    De witte plastiekjes zijn afdekkapjes. Het is beter om telkens het kleine dekseltje van het witte plastiekje te openen, om vervolgens de onderliggende klem los te trekken.

    P-308 -

  9. xYFheR1GW5KtSKUs
    • Unclip the clips using a thin screwdriver

  10. Xht6hgG2OgbyJZ2h
    Xht6hgG2OgbyJZ2h
    CXrAjb5hQAYZBmrI
    2jn4ZL1rNfTmcGey
    • Pry loose on these four spots and remove.

    When your machine is leaking, this is the right moment to diagnose it once this step is done. I suspect most pressure is on the parts when using a new cup. Screw back the lever to insert a new cup. Reconnect the power cord and put the water tank seat back on so the water container can be used.

    When putting the machine back together this point is obviously also the right time to test if everything is working (again) as expected.

    Ferry de Boer -

  11. AvDYi1x3uJkwVDtC
    AvDYi1x3uJkwVDtC
    mWnlYjSYHpiAmvyr
    glUMUH6VmFHIIXL1
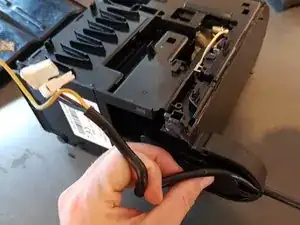
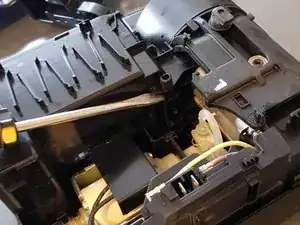
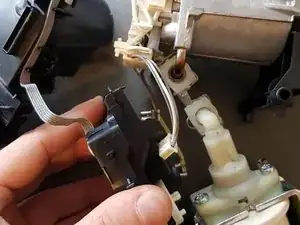
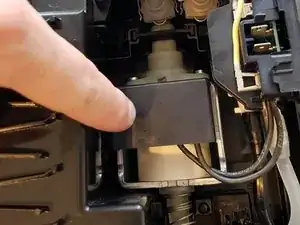
    • Photo 1: Using leverage, pull up.

    • Photo 2: unclip the two clips on the inside of the cover.

    • Photo 3: turn over and lift the cover off.

    L'étape 11 est délicate à réaliser. Je n'y suis pas arrivé, j'ai cassé une pièce => Poubelle

    Alpes Tour -

    Hola Alpes, Por desgracia este paso no es sencillo , es el mas complicado de todo el desmontaje, y alguna vez se rompe algun anclaje, lo he podido constatar en varias que he desmontado similares

    Carlos López (España - Spain) -

    De plus, au remontage, il faut veiller à ce que "le tout" s'emboîte bien au niveau de la zone située près de la lame du tournevis. Sinon, "le tout" est trop haut et va empêcher le positionnement correct du "premier côté". La manœuvre de (ré)emboîtement demande assez bien d'effort.

    JPKuypers -

    Traduccion de JPKuypers: Además, al volver a montarlo, asegúrese de que el "todo" encaje en la zona próxima a la hoja del destornillador. De lo contrario, el "todo" queda demasiado alto e impedirá la correcta colocación del "primer lado". La maniobra de (re)montaje requiere bastante esfuerzo.

    Carlos López (España - Spain) -

    Je ne comprend pas quelle pièce vous cherchez à retirer? Si on procède de la manière décrite, il n'est pas possible de ne pas casser du plastique.

    Ahah -

    Traduccion

    ¿No entiendo qué parte está intentando eliminar? Si procedes como se describe, es imposible no romper el plástico.

    Carlos López (España - Spain) -

    Je ne comprend pas quelle pièce vous cherchez à retirer? Si on procède de la manière décrite, il n'est pas possible de ne pas casser du plastique. En effet des pièces supplementaires sont à enlever avant, notamment à l'intérieur de la structure sur le haut de la figure 1. Le tournevis photo1, tel qu'il est positionné fait pression sur la même pièce plastique d'où casse certaine si vous forcez!

    Ahah -

    Traduccion

    ¿No entiendo qué parte estás intentando quitar? Si se procede como se describe, no es posible evitar romper el plástico. Primero hay que quitar otras piezas, sobre todo dentro de la estructura de la parte superior de la figura 1. El destornillador de la foto 1, tal como está colocado, ejerce presión sobre la misma pieza de plástico, ¡que se romperá si lo fuerzas!

    Carlos López (España - Spain) -

    No te queda mas remedio que realizar palanca para poderdesmontar esta parte de la maquina.

    Carlos López (España - Spain) -

  12. SVoYZDNPDYBKMOvL
    SVoYZDNPDYBKMOvL
    jFwhXKTftjmgVdUf
    • Push on the assembly, front to back, to free up the lever seats. Then pull them out.

  13. HT2YpYgfXASTCje1
    • The top part can be removed by having the metal pins follow the slots in an L shape.

    Il porta capsula può essere rimosso sganciando le due linguette;

    sotto c'è un O-ring che più perdere acqua in pressione che poi fuoriesce sotto la macchina in funzione!

    Qualcuno sa dove posso trovare l'O-ring di ricambio???

    Grazie!

    Devis Mariotti -

  14. VlwPngrHej25WIMx
    VlwPngrHej25WIMx
    kJU5RnWU6pe1wvOV
    GguXGHa3Eq3N2tnN
    • Pry open both clips on one side of the spout, then both on the other side.

  15. ybqYwWyv2EJSbIsI
    ybqYwWyv2EJSbIsI
    jwsvB4kDlXCcD2ba
    UOEnuG6EEappfVhG
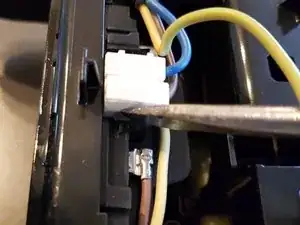
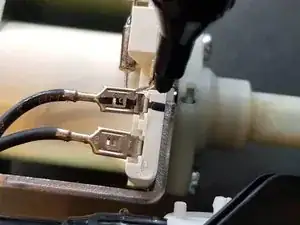
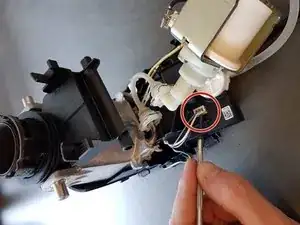
    • Mark one of the black leads for proper reinstallation.

    • Remove the yellow and brown wire.

    • And the white connector.

    When putting the machine back together make sure the spring on the bottom of the pump is propely back in the seating. If not the machine will resonate like crazy.

    Ferry de Boer -

  16. WZTR5KHvdgSwCfkD
    WZTR5KHvdgSwCfkD
    pxtJeFCdwwWHE2XN
    kJ6SFLxZnLAcvmLN
    • Wiggle loose the last bit of black plastic.

    • Pry off the white and black water lines.

  17. qRiQIRmwSjnsIihx
    qRiQIRmwSjnsIihx
    I3EBpvPxiFuXaEQG
    LUo5FWHCDYBvVoTF
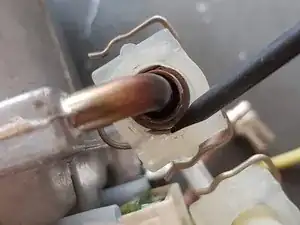
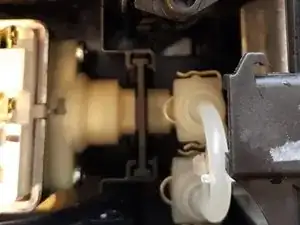
    • These clips are tricky to remove. The plastic rectangles housing the wire clips are part of the U-pipe. Bear this in mind when detaching the U-pipe from the two other (pump and boiler) pipes - which have cone shaped flanges; easy to push U-pipe faces onto, hard to detach.

    • Using the perspective of Photo1 for reference, for ease of working, ensure the background is down towards the floor, and ensure the metal pipe is braced, directly or via the boiler resting on a non-slip surface like a rubber mat or carpeted floor. Set-up the equivalent if working from the pump end of the U-pipe.

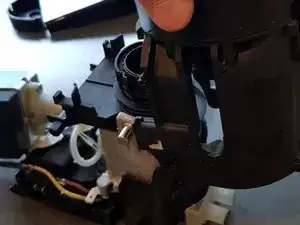
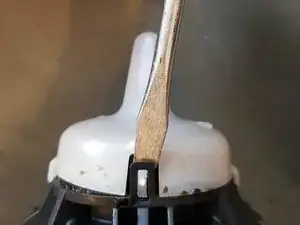
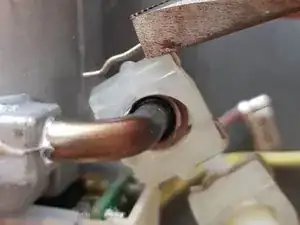
    • Push a 2.5mm thick pointed tool (rod or flat) into the wire loop that emerges from the centre-bottom of the plastic face. Do not make the loop emerge farther, but you can widen it <1mm with a suitable width screwdriver.

    • Left and right shoulders of the wire clip are to be pulled apart as far as the plastic face will allow. Start by inserting (and leaving in place) similar 2.5mm-3.5mm thick pointed/tapered tools between the outside edge of the plastic face and the exposed wire ends. Insert near each shoulder.

    • With the wire clip being held apart in three places, check that the wire in the centre of the plastic face is not still hugging the pipe but is just proud of the rim of the cone-flange. Another pointed tool may be needed to manipulate the rest of the wire over the edge of the cone-flange.

    • With the perspective of photo1 (or equivalent view from the pump), use a finger either side of the pipe to push the plastic face away from the boiler or away from the pump (towards the floor if positioned as advised earlier). The plastic face may need rocking during this process to manipulate any remaining wire over the last sub-mm of flange.

    • The joint should disconnect gracefully. If the joint does not disconnect, examine the centre hole of the plastic face again, checking where the wire is fouling the cone-flange. Reposition the three other pointed tools -previously left in place holding the wire apart- as necessary.

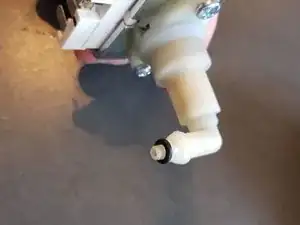
    • The 'O' ring each end of the plastic U-pipe will be easily accessible once the joint is apart. The inner diameter is approx 3mm. Outer diameter is approx 5mm ('O' ring is 1mm thick).

  18. HeEQRYTpLtPiAQBw
    HeEQRYTpLtPiAQBw
    w1SJNcq2leXw5GaC
    cePOOy3RKRVWXWtV
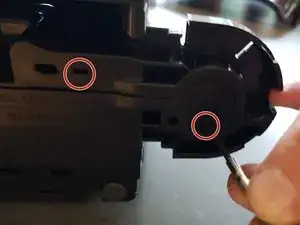
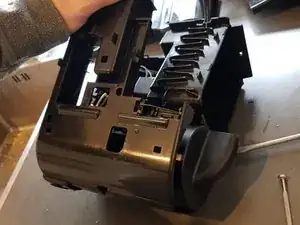
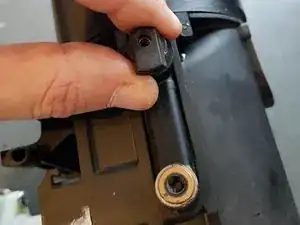
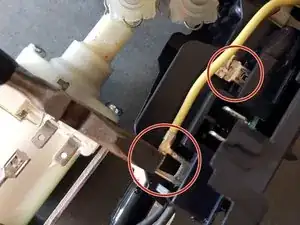
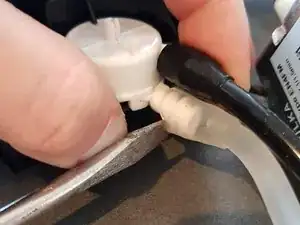
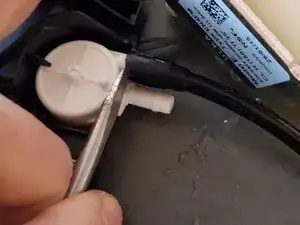
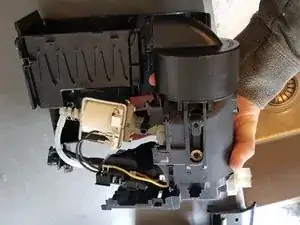
    • Photo 1 and 2, note the tapered edges, these hold the wire clip in place. Reinstallation is simple, just push the on again.

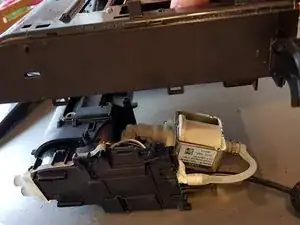
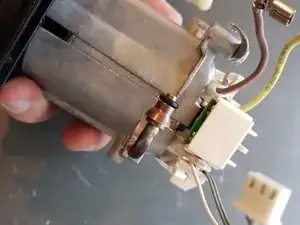
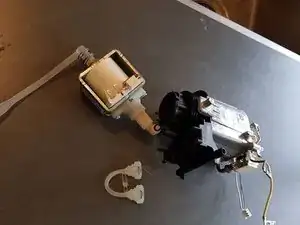
    • This was as far as I was able to go. In my case the part shown on the right in photo 3 was leaking in between the metal and plastic. Sadly it couldn't be disassembled any further.

    Van you mark the spot where it was leaking?

    Marcel Veldhuizen -

    I noticed the water in between the plastic and metal part. Only later I was able to take the heater apart with force, the leak was inside, in de middle.

    The black part twists a bit to one side that way you can get it off. Needs quite some force, though!

    Léon Witteman -

    I have a leak at exactly the same spot. How do you fix this? I first thought it was the small o-ring, but I think it's where the heating pipe exits the heater…

    Steven Verbrugge -

    I had the same issue and by rotating the plastic part this can be removed from the boiler housing. Inside there is a small o-ring which in my case was worn. Now need to find replacement ring…

    Jeroen van Ruitenbeek -

    Hey Jeroen, I had the same leakage problem, and want to replace the o ring! did you manage to find out which o ring you need? I suspect it is this one, but not sure: https://www.partsnl.nl/ms-0019105-krups-...

    arno_holtrop -

    Hello, I did not test yet but I replaced the Oring by a nitrile P5 (4.8x1.9) Oring from a Oring kit I have. It fits well and need a little push that feel secured. I recommend nitrile Oring given the temperature and not rubber.

    [deleted] -

    Also got it off, using a screw driver on on side to rotate to the side where there is visibly space to move to. Inside tough, I couldn't find anything, also not that o - ring! Tomorrow I'll take another look I guess. I was wondering if any of you managed to fix the leakage problem in the end, as it seems I have the same problem (magimix m105)

    arno_holtrop -

    Hi, I had the same problem and arrived to the same step, but I couldn't remove the plastic part from the metal part. In fact I broke a bit the plastic part when forcing it.

    I would also like to know if anyone finally fixed it.

    Thanks!

    Javier Cebollada -

    Hi, I am close, just ordered a new o ring and will try to assemble tonight or tomorrow, I could show you a little video how to do it if you give me your email, I don't know how to post it here.

    arno_holtrop -

    I managed to separate the heater from black inner. Held in a vice, gentle tap to turn clockwise and it opens.

    There is a little o-ring inside the end of the black plastic. I pulled it out cleaned and reversed it back in.

    re-assembled it does not appear to leak, for now at least.

    Chris Miller -

    Do you happen to have pictures of the process? I have the same issue and can’t split the heater from the front plastic panel

    Avner Israel -

    Can you please show some photos of how to split the black plastic from the heater? Thank you very much in advance

    Boomer Liu -

    Anyone find the right o-ring to fix the leakage. I tried 2 different one, it all seems to thinner than the original one

    Richard Siao -

    Hi everyone. I seem to have the same exact leak as you all do but haven’t managed to separate the heater from the plastic part yet. I wasn’t planning to as I wanted to fully replace the part. And well, I didn’t think it would be so complicated to find that spare part. You can easily get it from european websites but it’s 230V… For some reason, I cannot find the heater element in 120V through North-American sellers… does anyone know where I could buy one? Thanks a lot :)

    Emilie Desrue -

    Hello Sir. May I ask except for the heater, is there any other part only work in 120V? I have a broken 120v machine ( CPU board broken ) and another broken 220V machine (black plastic part in the heater broken). I want to put the 220v CPU board and heater into the 120V machine. I am wondering if the pump is working on 120V? or it works on a fixed Voltage output by the CPU board? Thank you in advance.

    Boomer Liu -

    Yep mine has the same problem. Trying to find the right replacement o-ring now.

    Matt T -

    Hoi, Ik wil de Inissia aanpassen voor camping gebruik. Hiervoor zou ik een diode vb P2000M in lijn moeten zetten met de verwarmingsweerstand. Ik heb geprobeerd om de diode in de gele draad te zetten die naar het drukblok loopt (de gele draad die in stap 11 is te zien). Maar dat werkt niet. Het resultaat is een toestel waarvan de lampjes 3 keer kort flitsen, pauze en weer 3 keer kort flitsen. De diode zit dus mogelijk op de verkeerde plaats. Kunnen jullie me verder helpen?

    Frits Bonte -

    I used a large crowbar as a lever to open the brew unit's bayonet assembly. As mentioned elsewhere, the size of the o-ring (in the cavity of the large black plastic part into which the small black plastic sleeve and metal pipe slide) is 4.8x1.9 mm. In my case, replacing this o-ring did not stop the leakage. A lot of work with no favourable end result. The brew unit does not seem to be made for repair. Regarding the two metal springs and the tiny pipe in the middle of them (behind the cup holder), the following video is useful: https://www.youtube.com/watch?v=TY_B_Ytz...

    P-308 -

    La parte in plastica nera, collegata alla caldaietta, può essere rimossa. È sufficiente tenere ferma la caldaietta e ruotare la parte in plastica in senso orario. Spesso la perdita segnalata anche nella guida è associata ad un danneggiamento della parte in plastica in corrispondenza dell’innesto con la caldaietta. In altri casi, più fortunati, è sufficiente sostituire l’o-ring che si trova in corrispondenza di questo innesto, per evitare la perdita. La parte in plastica difficilmente si trova come ricambio singolo, solitamente è associato alla caldaietta, tuttavia se disponete di un’altra macchinetta da cui recuperare parti di ricambio, è possibile mantenere la caldaietta e sostituire solo la parte in plastica.

    Andrea Golisano -

    Muchas gracias Andrea, copio la traducción:

    La pieza de plástico negra, que está unida al caldero, se puede retirar. Basta con mantener quieta la caldera y girar la pieza de plástico en el sentido de las agujas del reloj. A menudo, las fugas que también se indican en la guía están asociadas a daños en la pieza de plástico del acoplamiento con la caldera. En otros casos más afortunados, basta con sustituir la junta tórica de este acoplamiento para evitar la fuga. La pieza de plástico raramente se encuentra como pieza de recambio individual, suele estar asociada al caldero, sin embargo, si dispone de otra máquina de la que pueda recuperar piezas de recambio, puede conservar el caldero y sustituir sólo la pieza de plástico.

    Carlos López (España - Spain) -

    Après plusieurs manipulations en tout genre j’en ai conclu ceci :

    Le joint est celui vendu pour la XN250 de référence MS 623318 qui est un joint torique

    Cela n’a pas arrêté la fuite et donc c’est le corps de chaudière qui est responsable quand celui-ci monte en pression de micro fissures laissent passer l’eau.

    À vide sans capsule il n’y a pas de fuite c’est uniquement quand on met la capsule donc plus de pression !!

    Donc changer le joint ne suffit pas dans la plupart des cas et on a que la solution de changer la chaudière

    THIERRY BRENAGET -

    Aussi j’ai eu l’expérience d’avoir la tête en plastique qui fuit alors qu’aucune fissure n’est visible à l’œil nu et je pense que c’est la tête qui est la cause des fuites et donc on ne peut l’acheter pour la remplacer cette pièce n’est pas vendue

    THIERRY BRENAGET -

  19. ULETDkRVgiJMrYKQ
    ULETDkRVgiJMrYKQ
    5mQW33tw4kunM2m5
    EerGLcRaoQgj2E3f
    • Assembly is the reverse of disassembly. The next steps are some points of note.

    • Photo 1: reverse of step 11: The easiest way to reassemble the side is to lay it flat and lower the inner body onto the side.

    • Photo 2: reverse of step 11: Make sure the black line goes over the white one.

    • Fit the rubber collar back over the pump.

    Also photo 2: make sure the spring is pushing against the plastic flange, and not going through it as pictured. The machine will be very noisy otherwise.

    Andrea A -

    Please clarify do you mean the tube should not be within the spring?

    anony Ab -

    I think he means that in my photo, on the right side of the spring it went through the cutout in the plastic housing. The tube does need to go through the spring, but the spring needs to be a bit more compressed to seat in the plastic rim. Imagine the spring in my photo to be compressed to about half its current length and it's still touching the left white plastic part.

    Léon Witteman -

  20. SYGCX1hVUwGGVnfg
    SYGCX1hVUwGGVnfg
    TQDYGkhvQZ2WJ6rA
    • Photo 1: Don't forget this cover.

    • Photo 2: reverse of step 10: make sure the clips line up with the slots.

    This machine seems to be identical to the Krupps model XN1001. Your instructions were very helpful with the reassembly.

    Repair Café Venlo-Zuid -

    Hey, my nespresso inissia’s cup holder fell off when I was emptying the used pods. I can’t seem to re-attach it. I didn’t find any broken or missing parts either. Please can you contact me on my email: sheza.umar@yahoo.com if you can help me out with it? Thank you!

    Sheza Umar -

    My clips don't secure the tube to the water heater, leading to leakage. How do you secure the clips? I ended up buying some new clips thinking it would make a difference but they are still very loose and don't hold the tube in

    william chou -

    Would you know the size of the o ring in the chamber?

    kristopher -

    Thank you, this description helped me a lot to repair my DeLongi Type EN 80 B (same). My problem was a o-ring in the pump (inner diameter 4,1 x 2). It was getting hard and the pump did not work any more. I replaced it with a diameter 3,5 x 2 and the machine make good coffee now again.

    Matthias -

    Traducido a Español el comentario de Matthias:

    Gracias, esta descripción me ayudó mucho a reparar mi DeLongi Tipo EN 80 B (igual). Mi problema era una junta tórica en la bomba (diámetro interior 4,1 x 2). Se estaba endureciendo y la bomba ya no funcionaba. La cambié por una de diámetro 3,5 x 2 y la máquina vuelve a hacer buen café.

    Carlos López (España - Spain) -

    Me ha venido perfecto tu manual, la férrea me pierde Justo por la unión que comentas y he desmontado la pieza! Para sacarla es necesario girarla el sentido horario con fuerza pero con tiento, y ahí se aloja un sello que se deforma con el tiempo.

    Jero Calvo -

  21. ktvvHBnpcS6ypFKp
    • Replace this with an equivalent safety capacitor: 0.1uF 20% 310V X1

Conclusion

To reassemble your device, follow these instructions in reverse order.

Serge-Henri Bijou

Member since: 03/01/25

73 Reputation

0 comments