
Introduction
Parts
-
-
The fault with this monitor manifested itself by becoming reluctant to start up. For a while it would start after repeatedly pressing the power button but then refused to work at all.
-
-
-
Remove the monitor bezel. I did this by brute force and ignorance by forcing a flat bladed screwdriver into the join around the edge and using leverage to unclip it.
-
The connecting cable to the push button panel is inconveniently short. Carefully remove the connector from the panel and put the bezel aside.
-
The innards of the monitor can now be lifted out of the back of the case.
-
Sorry, I wasn't intending to write this up at the time so didn't keep photos!
-
Remove the metalwork to expose the two printed circuits.
-
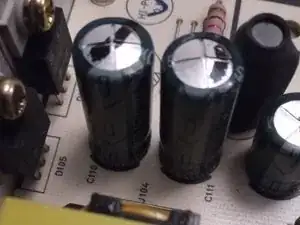
At this point the problem was obvious. See the bulging tops of these two capacitors.
-
Take a photo of the power supply board to record the positions of all the screws and connectors and remove the board then unclip the plastic insulation sheet from the back.
-
Note the values of all the electrolytics and order replacements. For the 450V 180μF part I used a Nichicon part, all of the others are Panasonic FR. Fit the new parts being careful to insert them with the correct polarity and reassemble the monitor.
-
To reassemble your device, follow these instructions in reverse order.