Introduction
Repair sticking commutator brushes on motor. If device gets left in a place where condensation can occur or if it has been left outside, moisture can cause corrosion in the brush holders which can result in the following symptom... Switch on lights up the pressure LEDs on the top of the unit but the motor will not run. Banging it lightly with a dead blow hammer on the sanding plate may allow it to run some more but it will eventually stop working again. The only solution is to remove the affected brush holder(s) and clean them thoroughly so the brushes move freely again.
-
-
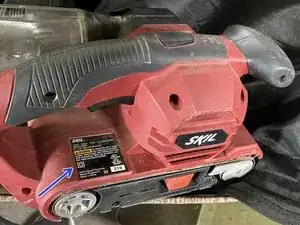
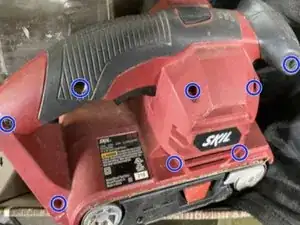
Remove the eight phillips screws indicated by the blue circles on the right side of the sander. Remove the right cover.
-
-
-
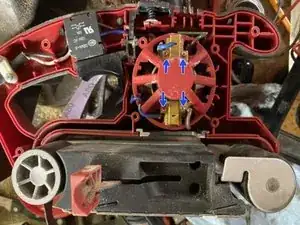
Remove the brush jumper wires (green arrow) from the brush holder assemblies. They are bayonet style connectors on both ends. You may fully remove them at both end if desired. This will give more room to removed the screws in the next step.
-
-
-
Remove the four small phillips screws indicated by blue arrows in the picture. Remove the brush holder assemblies.
-
-
-
Use a suitable small tool to depress each of the small tabs on the brush cap (yellow arrows) while applying gentle pressure on the opposite end of the brush itself. These tabs seat into the rectangular openings (red arrow) on the brush holder. You should press on the exposed end the brush that contacts the commutator surface.
-
If it is stubborn you may use some appropriate solvent to help get it moving. Next, used a small piece of emory cloth and solvent to clean the inside of the brush holder. Followed up by blowing out with compressed air. Should look like new now.
-
Now clean the carbon brush itself but using a fine brush and solvent. Before reassembling brush holder assembly ensure the brush moves freely in the holder as it should. Note that there is a groove on the bottom of the brush that must be inserted into the bottom of the holder as shown in the picture. The brush can bind if you put it in backwards.
-
Reinsert the brush starting from the end at the top of the photo. Make sure the yellow arrow indicated tabs are fully engaged in the red arrow indicated opening in the holder. The one on the bottom too! You can gently bend the tab arms to properly be retained if needed.
-
This is a good time to blow out all sanding dust inside the housing while you are in here! Now you are ready to reassemble in reverse order of the above steps.
-


To reassemble your device, follow these instructions in reverse order.