Introduction
(unfinished)
this fixes the infinite spinny dial problem where it like spins constantly regardless of actual input.
the problem is a broken ribbon cable; this is caused by a design flaw that puts too much pressure on it, breaking a couple connections.
the fix is replacing the entire ribbon cable;
the part can be found on aliexpress listed as "sony a7 ii flex cable", you would want the one listed as "with ic" (unless you feel like doing a ton of smd soldering)
some of the pictures on this guide are an a7r ii - these pictures specifically are ones that are identical what it would look like on an a7 ii. (though the a7r ii is built slightly different the pictures chosen here are ones where the part of focus is at least mostly identical to that of an a7 ii)
the irony of this being a camera repair guide but having bad pictures is something im aware of but this camera is an actual dust magnet so like
Parts
-
-
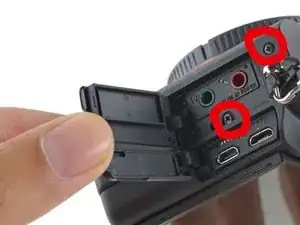
there are 2 screws in the bottom of the battery compartment; one is silver 5mm, the other is just another 4mm
-
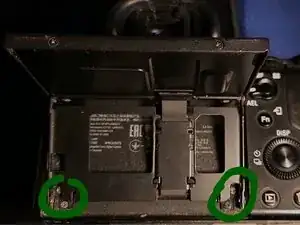
remove the battery door; Looking on the inner side of the battery door, pull the small lever upwards (there is an arrow next to it with the direction it should be pushed.) continue holding lever up and gently pull battery door away from camera body.
-
-
-
open camera screen. remove screws underneath screen on upper half of body will all be 3mm #000 phillips screws (*3)
-
remove hinge screws. these are all 2mm #000 philips screws (*4). --- these are the only 2mm screws in the entire camera.
-
-
-
remove the ribbon cable from it's bracket. this is a thin metal strip that you slide upwards and pull out from the screen hinge/casing to remove. Use a little isopropyl alcohol to dissolve the adhesive securing the ribbon cable to it's bracket.
-
there is another thin metal casing on top of the screen's zif connector. this is removed by simply sliding it downwards.
-
-
-
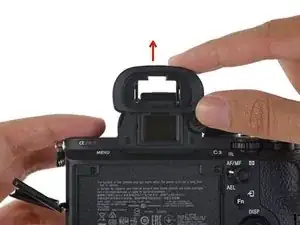
remove viewfinder eyepiece. (slide upwards)
-
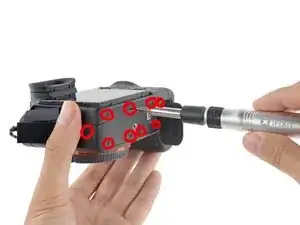
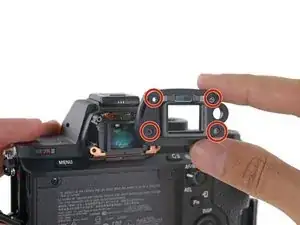
remove 4 screws on viewfinder (4mm #000 *4)
-
Remove diopter adjustment wheel. this uses a unique, special screw - keep the screw and the wheel together.
-
-
-
with the screen and body screws removed, the faceplate can be removed from the back of the camera. Pull out the faceplate towards yourself.
-
-
-
dissassemble camera according to video. you should not remove the motherboard, sensor, or shutter mechanism - all the ribbon cables for the button/dial ribbon cable are on the upper edge of the motherboard, next to the viewfinder ribbon cable.
-
Remove old (damaged) controls ribbon cables (there are 2 of them iirc). These ribbon cables connect the controls, buttons, dials, shutter, and exposure adjustment knob to the motherboard.
-
(firmly, but somewhat gently) fold the new controls ribbon cable in the same way the original one is folded. IT SHOULD BE INDENTED OR VERY LIGHTLY CREASED - BUT NOT FOLDED FLAT OR HEAVILY CREASED - as the heavy creasing and old age is what broke the old ribbon cable.
-
Plug in the ribbon cable for the exposure adjustment knob to the controls ribbon before placing the it back in the case. Make sure it sits in the indentations and makes contact with the buttons of the outer case.
-
Consider using a small piece of thin or thin-ish double sided tape to hold the controls ribbon in the correct shape. Test the controls ribbon after placing it in the case correctly and connecting it to the motherboard - before reassembling the camera. Do not forget to reconnect the ribbon cable for the exposure adjustment knob.
-

To reassemble your device, follow these instructions in reverse order.